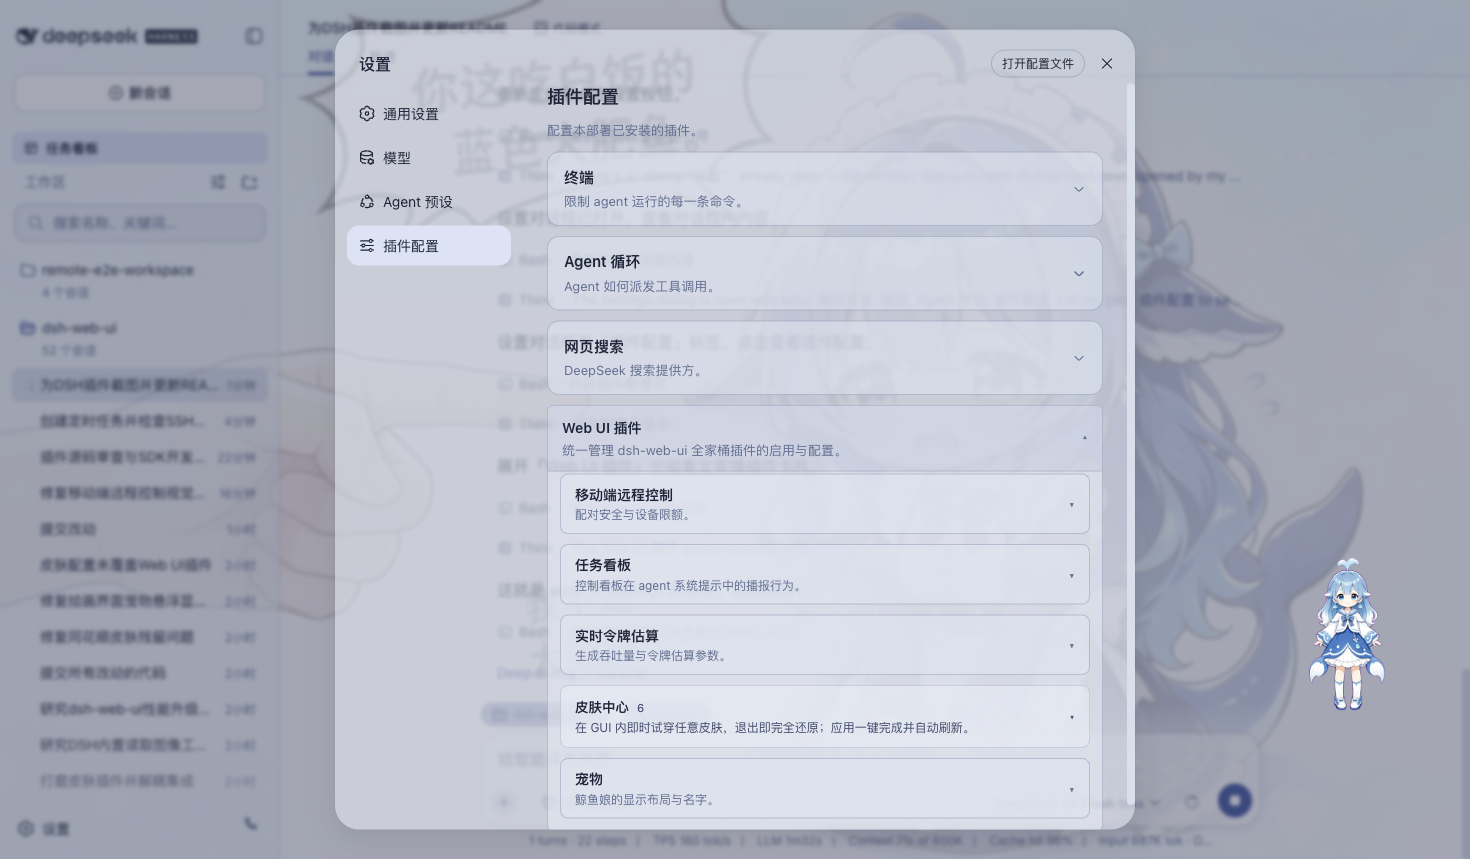
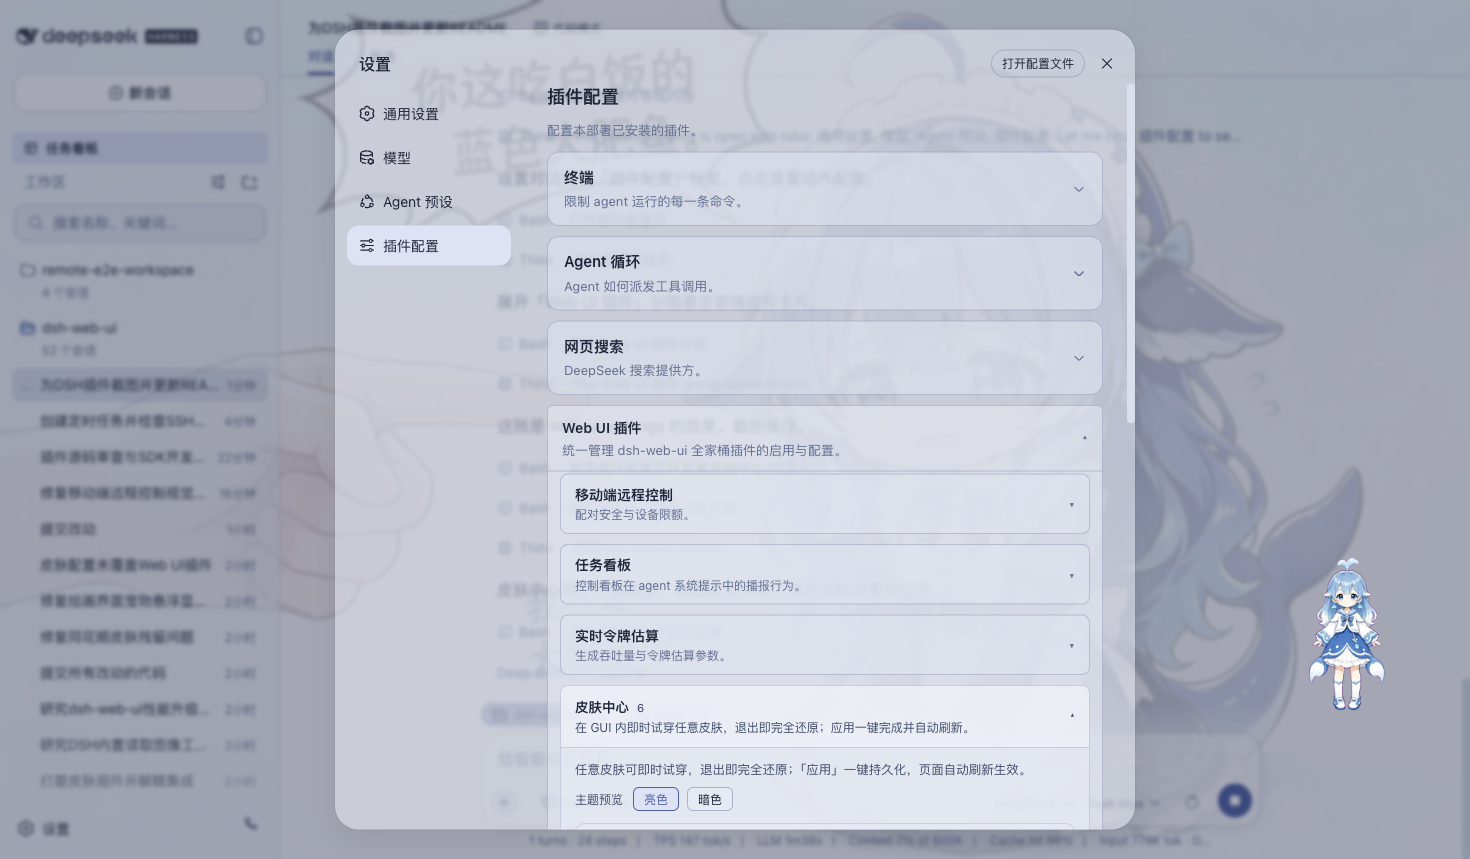
在 DSH Web GUI 设置里嵌入皮肤中心卡片,列出全部已装皮肤并支持 GUI 内即时试穿与一键应用,无需复制命令或重启。
ⓘ 此插件是大仓库 ningbainb/deepseek-harness-desktop 的子包,星数与活跃度统计的是整个仓库。

- 语言
- TypeScript
- License
- BSD-3-Clause
- 分支
- main
安装
$ dsh plugin --profile web add @linxin666/dsh-client-ui-skin-center在终端中运行以上命令,通过 dsh CLI 安装此插件。可在右上角切换 Profile。 第一次用 dsh?看这篇新手教程
对话式安装
帮我安装 DeepSeek Harness 插件 ningbainb/deepseek-harness-desktop/packages/skins/skin-center:先查看仓库 https://github.com/ningbainb/deepseek-harness-desktop 确认安全性,然后执行安装命令并验证插件加载成功。
把这段指令粘贴给 DSH Web GUI 里的助手,由它代你完成安装与验证。
一句话定位
在 DSH Web GUI 的「Web UI 插件」分组里嵌入一张「皮肤中心」卡片,把已安装皮肤做成可在浏览器里即时试穿、并一键应用到当前 profile 的可视化面板,省去复制终端命令和重启服务。
核心能力
- 在「设置 → 插件配置 → Web UI 插件」里添加一张「皮肤中心」卡片,与 task-board、pet 等共用同一槽位(
web-ui.plugin.item),不占设置一级导航。 - 自动列出当前 profile 下已安装的全部皮肤(含官方默认),每个皮肤卡片显示名称、tagline 和强调色色块;当前激活的皮肤带「Active」标识。
- GUI 内实时试穿:点"试穿"后按需加载该皮肤的 client bundle,立即看到效果,支持亮/暗主题切换预览;"退出试穿"会完整还原试穿前的视觉状态(body 属性、背景样式、皮肤 chrome 子节点等都被快照并在退出时原样恢复)。
- 一键应用:点击"应用"或"恢复默认"会调用 host 端
/api/skin-center/apply,由 host 进程内嵌的dsh-skin use移植版把当前选择写入<harness-home>/profiles/<profile>/cordis.patch.yml,DSH 配置 watcher 在数秒内热载入并自动刷新页面,整个过程无需手动复制命令、无需dsh web重启。 - 主题预览与背景遮挡:卡片内置亮/暗主题切换控件,以及 0–100% 的背景遮挡滑杆(仅对带背景图插画的皮肤生效,官方默认不受影响)。
- 失败兜底:apply 接口返回错误时,UI 上会附带
dsh-skin use <name>/dsh-skin use official的终端兜底命令。
技术实现
- 语言: TypeScript + React 18(jsx: react-jsx,target es2024)
- 关键依赖:
@deepseek-ai/cordis(插件运行时)、@deepseek-ai/dsh-client-runtime/dsh-client-locale/dsh-client-ui-theme/dsh-client-ui-settings/dsh-client-ui-slots/dsh-settings(浏览器与 host 半区 SDK),schemastery(设置命名空间 Schema 校验),react ^18.2.0作为 peerDependency - 架构模式: cordis bundle 双半区包,符合 DSH 官方 bundle 形态;
src/index.ts是 host 半区(注册/api/skin-center/*HTTP 路由、把"皮肤中心"卡片挂到「Web UI 插件」分组),src/client/是浏览器半区(卡片组件 + 试穿引擎 + 背景控制器 + i18n 字典),共享纯逻辑放在src/根目录(skin-switch.ts为 host 进程内嵌的dsh-skin use/current移植版) - 入口文件: host 入口
src/index.ts(apply 注册路由)、浏览器入口src/client/index.ts(apply 注册卡片与字典);cordis 插件 id 为ui-skin-center,对应cordis.patch.yml中插入的 insert 行
适用场景
希望快速试用或切换皮肤、不想在终端手动执行 dsh-skin use 又担心命令拼错的 DSH Web GUI 用户。当官方原貌不够个性、想立刻对比几款皮肤效果时,皮肤中心可以在不重启服务的前提下实时试穿,决定后一键落盘。对于已装多个皮肤的 profile,皮肤中心还解决了"如何用一个面板统一管理它们"的问题。
前置依赖与兼容性
| 依赖 | 最低版本 | 说明 |
|---|---|---|
| @deepseek-ai/dsh-* | ^0.1.0-rc.7 | host 与 client 半区都通过官方 NPM SDK 注入服务;package.json 未单独声明 dsh_version,devDependencies 中所有 @deepseek-ai/dsh-* 均为此版本 |
| @deepseek-ai/cordis | ^4.0.1 | 插件运行时 |
| React | ^18.2.0 | peerDependency,浏览器卡片组件使用 React hooks |
| Node | ^22.19 || >=24 | 仓库 packages/AGENTS.md 强制要求;package.json 未声明 engines |
| 平台 | 跨平台 | 皮肤切换逻辑与 GUI 卡片均跨平台;Windows 下 profile 链接在 symlink 权限不足时自动回退为目录 junction,不需要开发者模式 |
| 原生模块 | 无 | package.json dependencies 仅含 schemastery(纯 ESM),无需 native binding |
安装方式
dsh plugin --profile web add github:ningbainb/deepseek-harness-desktop/packages/skins/skin-center
配置项
| 配置 | 类型 | 说明 | 默认值 |
|---|---|---|---|
| skin-background.backgroundOpacity | 0–100(步长 5) | 主页背景遮挡强度;仅对带背景图插画的皮肤生效,官方默认无背景图不受影响 | 0 |
| ~/.dsh / $DSH_HOME | 路径 | DSH 主目录,决定 host 写入哪个 profile 的 cordis.patch.yml 与 node_modules 链接 | ~/.dsh |
| $DSH_SKIN_PROFILE / $DSH_PROFILE / process.cwd() 位于 profiles/ 下 | profile 名 | 决定 host 端写入的目标 profile(依次取显式 option → DSH_SKIN_PROFILE → DSH_PROFILE → cwd → 默认 web) | web |
常见问题
Q: 装完后在哪里打开皮肤中心?
A: 装好后需要刷新一次 DSH Web GUI 页面,然后进入「设置 → 插件配置 → Web UI 插件」分组,里面会多出一张名为「皮肤中心 / Skin Center」的折叠卡片。卡片与 task-board、pet、live-stats 共用同一个槽位(web-ui.plugin.item),不会占设置页的一级导航。
Q: 切换皮肤要重启 DSH web 吗?
A: 不需要。整个流程是:UI 调用 /api/skin-center/apply → host 进程内嵌的 dsh-skin use 移植版把当前选择写入 <harness-home>/profiles/<profile>/cordis.patch.yml → DSH 配置 watcher 在数秒内热载入 → 页面自动刷新进入新皮肤。这一切都在 host 进程内完成,无需 dsh web 重启,也不要求 PATH 上有 dsh-skin 二进制。
Q: "试穿"和"应用"有什么区别?
A: 试穿只在浏览器里临时加载皮肤 bundle 到当前页面,刷新或重启后失效;应用会调用 host 的 /api/skin-center/apply,由 host 端把选择落盘到 profile patch 并迁移旧的全局 dsh-skin managed 段(如果存在)。简单说:试穿是"看一眼效果",应用是"真的换上"。
Q: 为什么皮肤列表里没有某些皮肤?
A: 皮肤中心只列出当前 profile 下已安装的皮肤包。每个皮肤是独立的 npm 包(如 @linxin666/dsh-client-ui-skin-qq98),需要先单独安装,或通过全家桶聚合包 @linxin666/dsh-skins 一次装齐。安装后刷新页面,列表会自动更新。
Q: 应用失败时怎么兜底?
A: apply 接口返回错误时,UI 上会显示一段提示,里面附带可手动执行的命令:dsh-skin use <皮肤id>(如 dsh-skin use blue-fantasy)或 dsh-skin use official(恢复官方默认)。在终端里执行同样的命令可以达到相同效果。
Q: 怎么彻底卸载?
A: 在终端执行 dsh plugin --profile web remove @linxin666/dsh-client-ui-skin-center 即可,DSH 插件管理器会负责清理 profile 里的相关条目。皮肤中心本身只管理 dsh-skin managed 段,不会影响其他插件;卸载后该段也会一并清空。
Q: 在 Windows 上会有兼容问题吗?
A: 一般不会。profile 的 node_modules 链接在 symlink 权限不足时会自动回退为目录 junction(绝对路径),不需要开发者模式或管理员权限。皮肤切换、试穿、背景遮挡等纯浏览器逻辑完全跨平台。
上手难度
入门 — 装好后在 GUI 内点开「皮肤中心」卡片就能立即试用所有已装皮肤,"应用"一键落盘自动刷新,无需任何额外配置。
已知问题与限制
- pnpm ≥10 安装 git 依赖前需要先授权
allowBuilds(prepare脚本会原地构建),本地 link 安装则没有这个限制(README.md:30)。 - 本地 link 安装前需要在 monorepo 内先构建(
pnpm install && pnpm -r build),因为lib/被 git 忽略、不随仓库提交(README.md:28)。 - 皮肤中心只列出当前 profile 已安装的皮肤,要试穿更多皮肤必须先把对应的 npm 包装到 profile 中;皮肤中心本身没有自带互斥要求(README.md:32)。
- 从老版本 Desktop 2.2/2.3 升级时,如果
<harness-home>/cordis.patch.yml里残留有dsh-skin managed段,首次 apply 会把它迁移到当前 profile 的 patch 并从全局文件移除(src/skin-switch.ts:964-972),属于一次性迁移行为。 - Windows 下符号链接权限不足时回退为目录 junction,是已知降级行为而不是 bug(src/skin-switch.ts:765-799)。
中文 | English
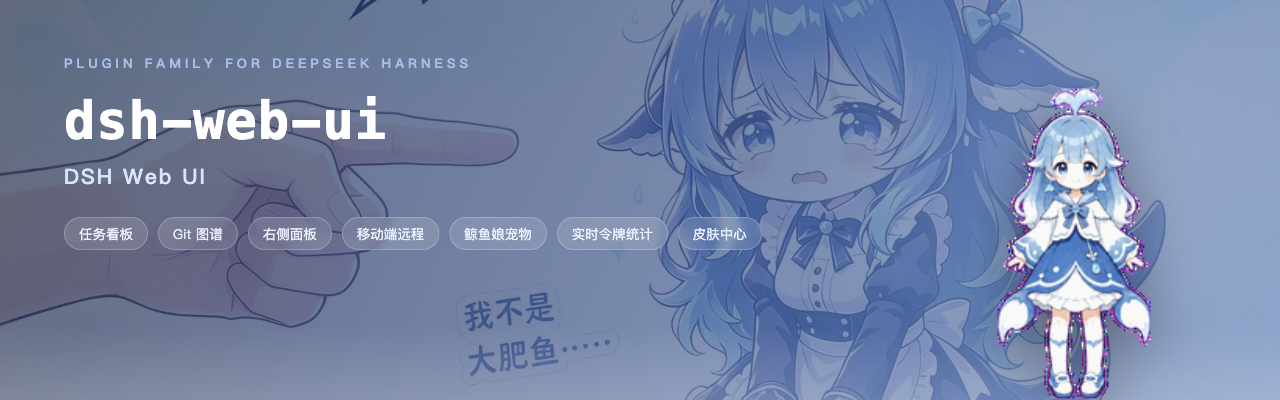
DeepSeek Harness Desktop 是社区维护的开源 Windows AI 编程桌面客户端:它把完整的 DeepSeek Harness Web Surface、官方 DSH 本地主机、插件、Skills、主题和自动更新打包进一个 Windows x64 安装器。支持 Windows 10/11,免费采用 BSD-3-Clause 许可证,安装后无需另配 Node.js。
社区用户交流群
QQ 群:1105158177 · 点击一键加入 QQ 群
Windows 桌面版
DeepSeek Harness Desktop 将原版 DSH Web 界面完整装进 Windows EXE:不是重写页面,而是用安全的 Electron 窗口启动官方 @deepseek-ai/dsh 本地主机,再原样加载本仓库的全部插件与皮肤。
浏览产品介绍 · 下载 Windows x64 安装器 · 桌面版技术说明 · Task Board v3 说明 · 发布与交接工作流 · 更新日志
如果这个项目对你有帮助,欢迎在 GitHub 仓库 点 Star,帮助更多桌面版用户发现它。
最新版:2.7.0
desktop-v2.7.0 是当前稳定版:查看完整发布说明 · 直接下载安装包 · 下载 SHA-256 校验文件
| 版本 | 主要更新 |
|---|---|
| 2.7.0 | 修复 Windows 8% Runtime 启动故障并升级到 DSH rc.7;新增托盘后台自动化、Host 持久任务调度、插件兼容声明/锁、browser-safe Desktop SDK、安全工作区外部打开和 Candidate Matrix。 |
| 2.6.0 | Task Board v3 引入 Project、Task Run、Evidence 与 Git Worktree 审核流;Runtime Provider 缺少可选能力时显式回退 shared-workspace,并加入 Candidate 执行兼容夹具与有界匿名产品统计。 |
| 2.5.0 | 新增 Runtime Adapter 与上游兼容防线、安全 .dshpreset 和 Web Profile 迁移、原子插件批量事务、严格 Deep Link/文件关联与结构化通知。 |
| 2.4.0 | 新增可靠更新关停回执 v2、主界面/扩展坞权限拆分、Desktop Contract v1,以及 Task Board Host 文件存储 v2。 |
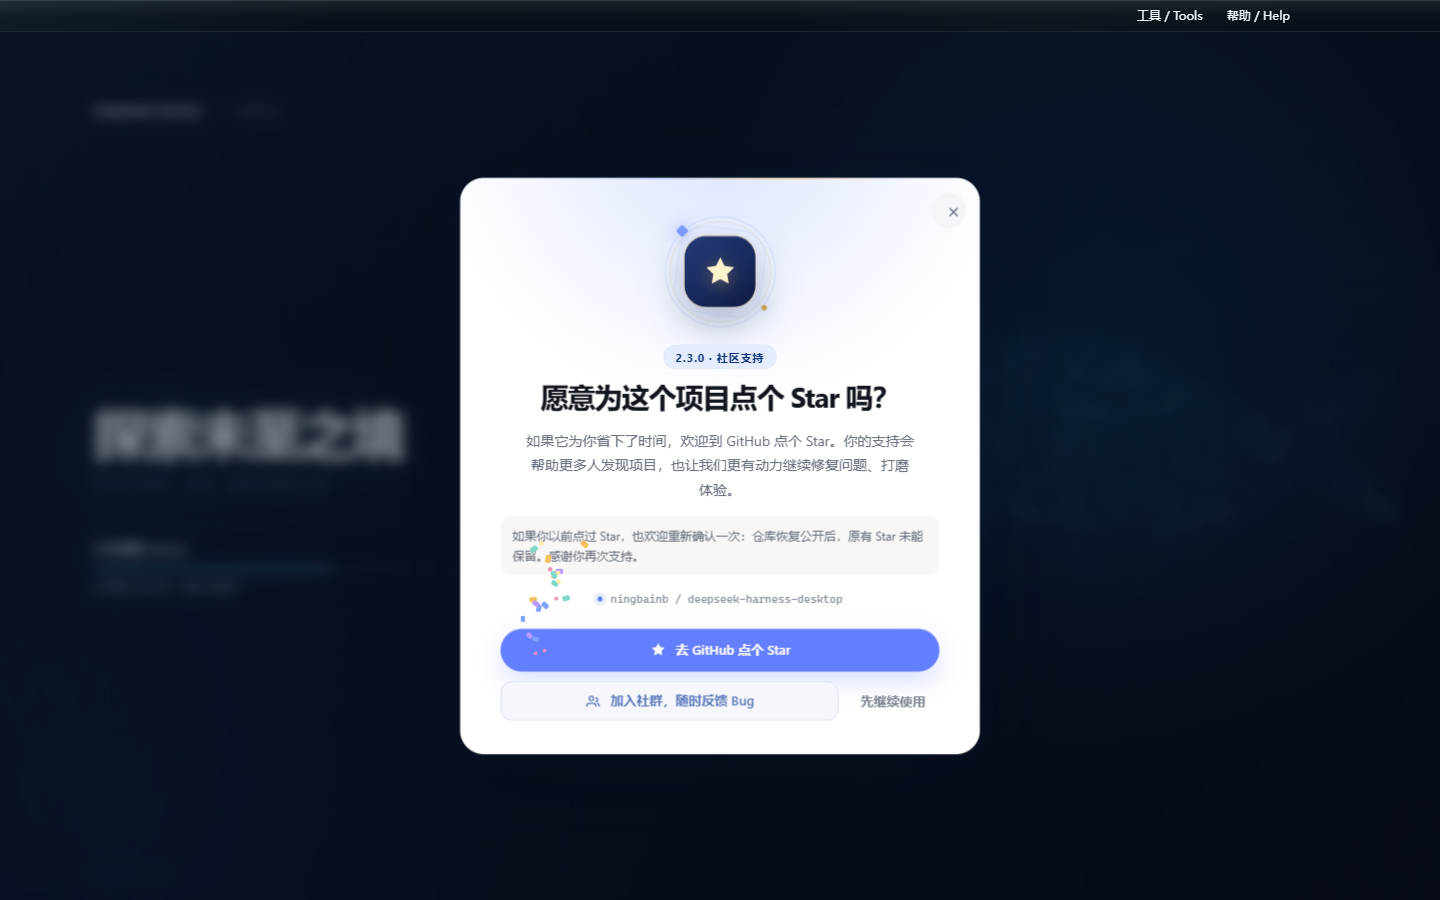
| 2.3.0 | 新增只出现一次的 GitHub Star 动画引导与“加入社群”反馈入口;安装预检可识别外部 PowerShell/CMD/Node 宿主、EncodedCommand 与 Windows 短路径,兼容 0.1.9 直接升级,并通过独立 profile 与端口回退和官方 Web 端共存。 |
| 2.2.0 | 隐藏 Windows 终端及其后代窗口;升级时自动清理旧应用和插件后台、迁移可识别旧依赖与旧安全模式误判;重启复用端口,安全模式支持可见提示与一键恢复。 |
| 2.1.0 | 新增国内更新镜像自动测速与回退、插件快照/自动隔离/安全模式三层容灾;统一皮肤持久化,修复升级文件占用、隐藏命令框、中文工作区重启循环,并从工具菜单直接打开扩展坞。 |
| 2.0.0 | 修复取消后排队消息滞留与运行时损坏循环;新增 Skills 菜单、模型 API 有界重试、思考区吸顶和 SSH 实时监控;统一 Harness 原生视觉并完善粒子鲸鱼启动页。 |
| 0.1.9 | 修复对话气泡与整段内容复制;更新改为后台下载并加入毛玻璃更新面板与粒子鲸鱼启动页;新增社区插件适配检测、离线切换、失败回滚与性能保护。 |
| 0.1.8 | 内置 ChatGPT OAuth 与 OpenAI Codex 模型、模型推理强度滑块、帮助菜单社群与建议入口;默认只保留 dshmarket,并修复空补丁、旧市场和皮肤链接迁移。 |
| 0.1.7 | 全新深海启动界面与状态驱动进度;32px macOS 风格磨砂玻璃窗口栏;收紧大文件预览内存、Git 轮询和 SSH 传输边界,并提升首次安装后的冷启动容错与发布门禁。 |
| 0.1.6 | 内置腾讯官方 QQ Bot 与扫码 Connector;在扩展坞完成二维码绑定、刷新、取消、重新绑定和解绑,QQ 私聊与群聊可直接接入桌面版 Harness。AppSecret 使用 Windows 凭据保护加密,只注入 DSH 子进程。 |
| 0.1.5 | 原生标题栏跟随亮色/暗色主题;全屏弹窗避开标题栏安全区;修复安装版皮肤发现与切换,并内置 dshmarket 和 dsh-plugin-hub。 |
| 0.1.4 | 桌宠迁移到全局 Shell Overlay,首页和设置页均可见;恢复五张 Web UI 插件配置卡;皮肤中心完整展示安装版随附的九套皮肤。 |
| 0.1.3 | 加入稳定版 GitHub Release 更新检查、双语更新说明、用户确认下载、任务栏进度和二次确认安装。 |
2.7.0 功能亮点
- 可靠 Windows 启动:移除 PowerShell 5.1
-WindowStyle Hidden与 Electron Node 模式的冲突,隐藏窗口仍由spawn的windowsHide处理;空旧补丁、状态订阅竞态和 IPC 错误不会再把启动页永久留在 8%。 - 验证过的 Runtime 组合:内置
@deepseek-ai/dsh0.1.0-rc.7、dshmarket1.15.0、Web UI 聚合0.2.3、兼容 rc.7 的 Codex Connect 与dsh-live-stats0.1.20,Stable 继续精确锁定而非追随latest。 - 托盘与后台自动化需显式选择:默认关闭仍会退出。选择“最小化到托盘并启用后台自动化”后,关闭主窗口才保留 Runtime 和到期任务;显式退出、更新、安全模式和崩溃路径一律完整停止。
- Host 持久任务调度:Task Board 保存时区、cron 槽位、租约、misfire/running 策略和确定性运行键;启用后台自动化时通过真实 DSH Session 执行并回写 Task Run,Host 不可用时仍回退浏览器调度。
- 可审计的扩展边界:扩展坞校验
dsh.compatibility的版本、Desktop API、能力、Surface 与运行时证据,并在 profile 写入desktop-plugins.lock.json。browser-safe SDK 不导入 Electron 或私有 DSH 模块;预览的外部打开仅传工作区根和相对路径,Host 验证后才交给系统。 - Candidate Matrix:候选 DSH 在临时 worktree 中收集矩阵、Stable 支持和离线社区插件质量证据;候选永远不能自动改写 Stable 依赖、lockfile、更新元数据或发布。
2.6.0 功能亮点
- Task Board v3:任务可关联 Project,明确选择 shared-workspace 或 Git Worktree;旧账本复制迁移到 Host-owned v3,原 v2 文件保留为备份。
- 可审阅执行结果:每次执行生成紧凑 Task Run 与派生 Evidence,展示文件、增删统计、有限 diff 预览、Session/运行入口和 Provider 能力证据,不保存完整会话或 Secret。
- 受控 Git Worktree:Host 只接受不透明 id,固定 Worktree 根目录、分支命名、realpath、clean/conflict/operation 预检;Commit、Merge、Keep、Discard 都是明确审核动作,Discard 需要二次确认。
- 安全兼容回退:Stable Provider 仍可只提供生命周期和 Profile 能力;缺少 Worktree 所需能力时记录原因并使用现有 shared-workspace 执行,不伪造隔离状态。
- Candidate 执行门禁:真实临时 Git 仓库夹具验证 Session CWD、生命周期事件、取消与重启恢复,失败只阻断 Candidate,不改 Stable 图或发布元数据。
- 匿名统计边界:官方正式版默认启用仅用于产品改进的有界匿名统计,不提供应用内关闭开关;不收集身份、对话、文件、路径、凭据或日志,不保留原始事件,源码与 Fork 构建不包含官方统计端点。完整范围见 隐私政策。
2.5.0 功能亮点
- Runtime 兼容防线:Adapter v1、直接 import 边界、Known Good、patch registry 与耦合审计共同保护稳定 DSH 图;Candidate Lite 只生成报告,不自动升级 Stable。
- 安全 Desktop Preset:
.dshpresetv1 在主进程检查完整性、路径、压缩比、脚本、Secret、Git URL 与精确版本,Renderer 只获得审阅计划。 - 全环境原子回滚:批量插件、设置、Skills 与任务模板使用一次 Runtime 停止/启动事务;任何包或健康检查失败都会恢复旧环境。
- Web Profile 选择性迁移:迁移前显示可安装、更新、缺失、不兼容、未声明、已满足和 Desktop 管理项;所选插件与可归属的非敏感 Profile 配置在同一事务中应用或回滚。
- 明确后续动作:插件变更后突出显示“刷新”;改变 bundle 图时同时提供“Restart DeepSeek Harness”,Preset 进度完整显示提交或恢复状态。
- 严格系统入口:
dsh://仅允许固定导航路由和安全 ID;.dshpreset双击只打开预览,不把文件路径交给 Renderer,也不会静默安装。 - 结构化通知:Desktop Contract 1.1 校验通知分类、ID、文本与 Deep Link,支持去重、限频、前台抑制和白名单点击路由。
- 稳定版不追 latest:当前 Runtime 继续精确锁定验证版本;Candidate 失败不会影响主分支、lockfile、发布说明或 updater 元数据。
2.5.0 体验与更新改进
- 全页粒子主题:粒子鲸鱼从启动页延伸到主界面,并按普通浏览、输入聚焦、弹窗、减少动态效果和后台状态自动调低密度、透明度与速度;可在「设置 > 插件配置 > 粒子主题」中开关和调整。
- 可调设置窗口:设置面板可拖动、从八个边/角缩放并记住上次位置和尺寸;最小尺寸、响应式布局和屏幕约束可避免内容重叠、溢出或移出可见区域。
- 明确的更新下载路径:GitHub Releases 是唯一默认下载源;更新窗口提供「前往 GitHub 下载」「加入用户群」「稍后更新」。若 GitHub 下载较慢,可加入 QQ 用户群获取同步安装包。
- 覆盖更新不再依赖旧卸载器:安装器会在严格进程与文件锁检查后迁移旧程序并清理精确注册项;即使旧 2.5.0 已带修复标记,也不会再次进入有缺陷的卸载流程。
完整桌面能力
- 排队消息可靠续传:智能体工作时发送的消息继续按 FIFO 顺序排队;取消当前执行后,队列会自动恢复,不丢失、不重复、不乱序。
- 对话栏 Skills 技能库:输入框左下角直接搜索已安装技能,支持最近使用、来源与描述展示、方向键导航、Enter 插入和 Esc 关闭。
- 模型 API 自动恢复:对限流、超时、断网和可恢复服务端错误执行有界退避重试;恢复后继续当前请求,手动取消仍会立即生效。
- SSH 实时监控与安全操作:每三秒刷新 CPU、内存、磁盘、负载、进程与失败服务;经过确认后可终止进程或重启 systemd 服务。
- 长思考随时折叠:思考区展开后,折叠控制会吸附在会话顶部,不必滚回长内容起点。
- 运行时完整性预检:启动前检查关键文件,安装不完整时停止重启循环并给出明确的重新安装提示。
- 更新与安装更可靠:GitHub 官方源优先,发现新版后后台下载,完成后再确认重启安装;GitHub 下载较慢时可从用户群获取同步安装包,退出时完整回收 DSH 子进程。
- Harness 原生视觉统一:标题栏、扩展坞、启动页和主界面使用一致的系统视觉;全页粒子鲸鱼会按交互场景自动安静下来,并尊重减少动态效果设置。
Harness 主界面
2.3.0 桌面界面
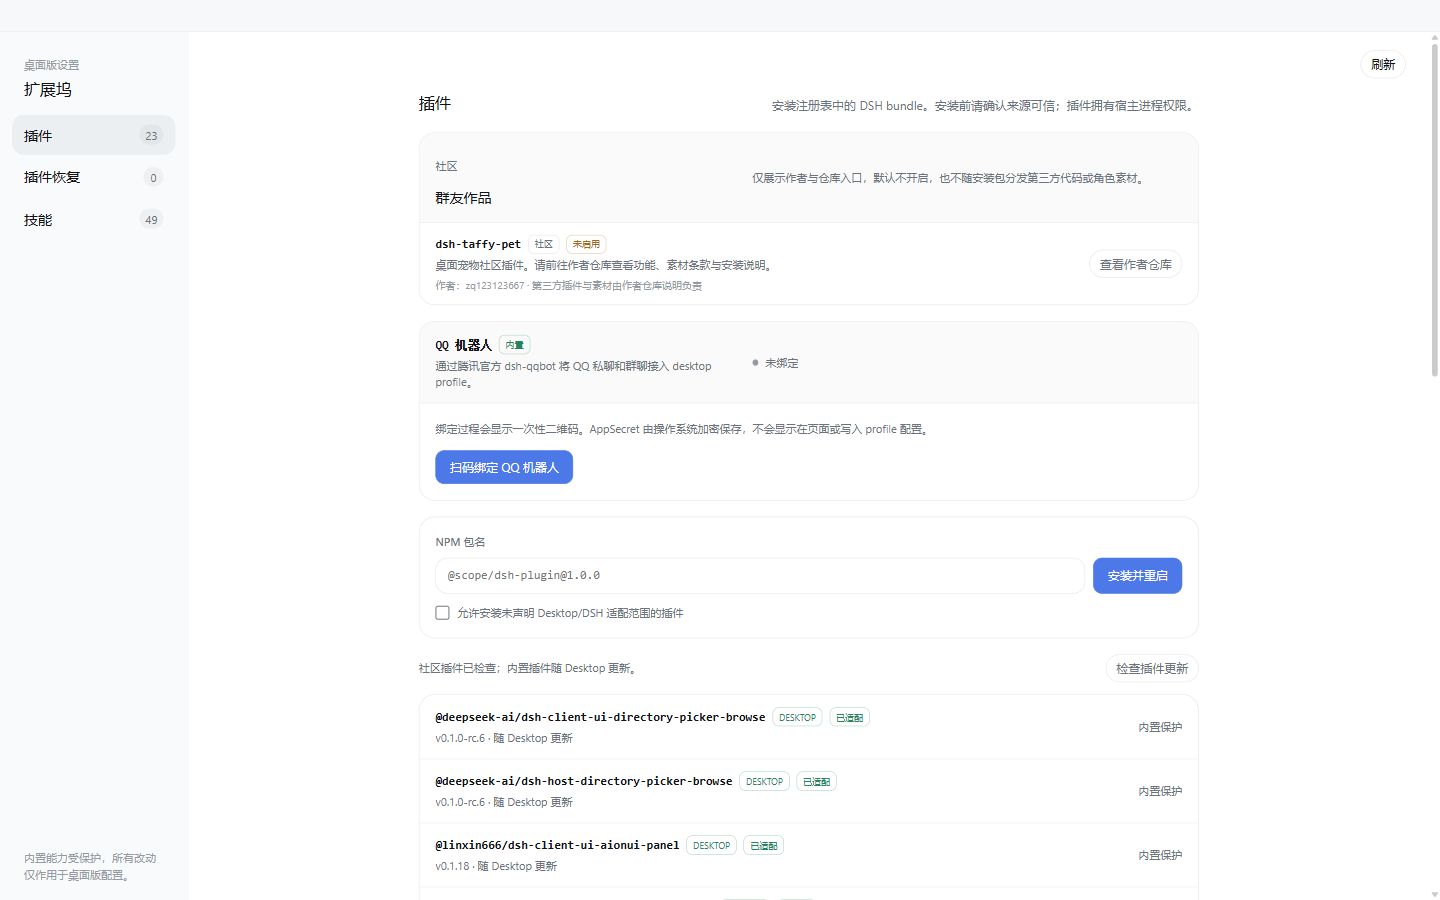
| 粒子鲸鱼启动界面 | 插件与技能扩展坞 |
|---|---|
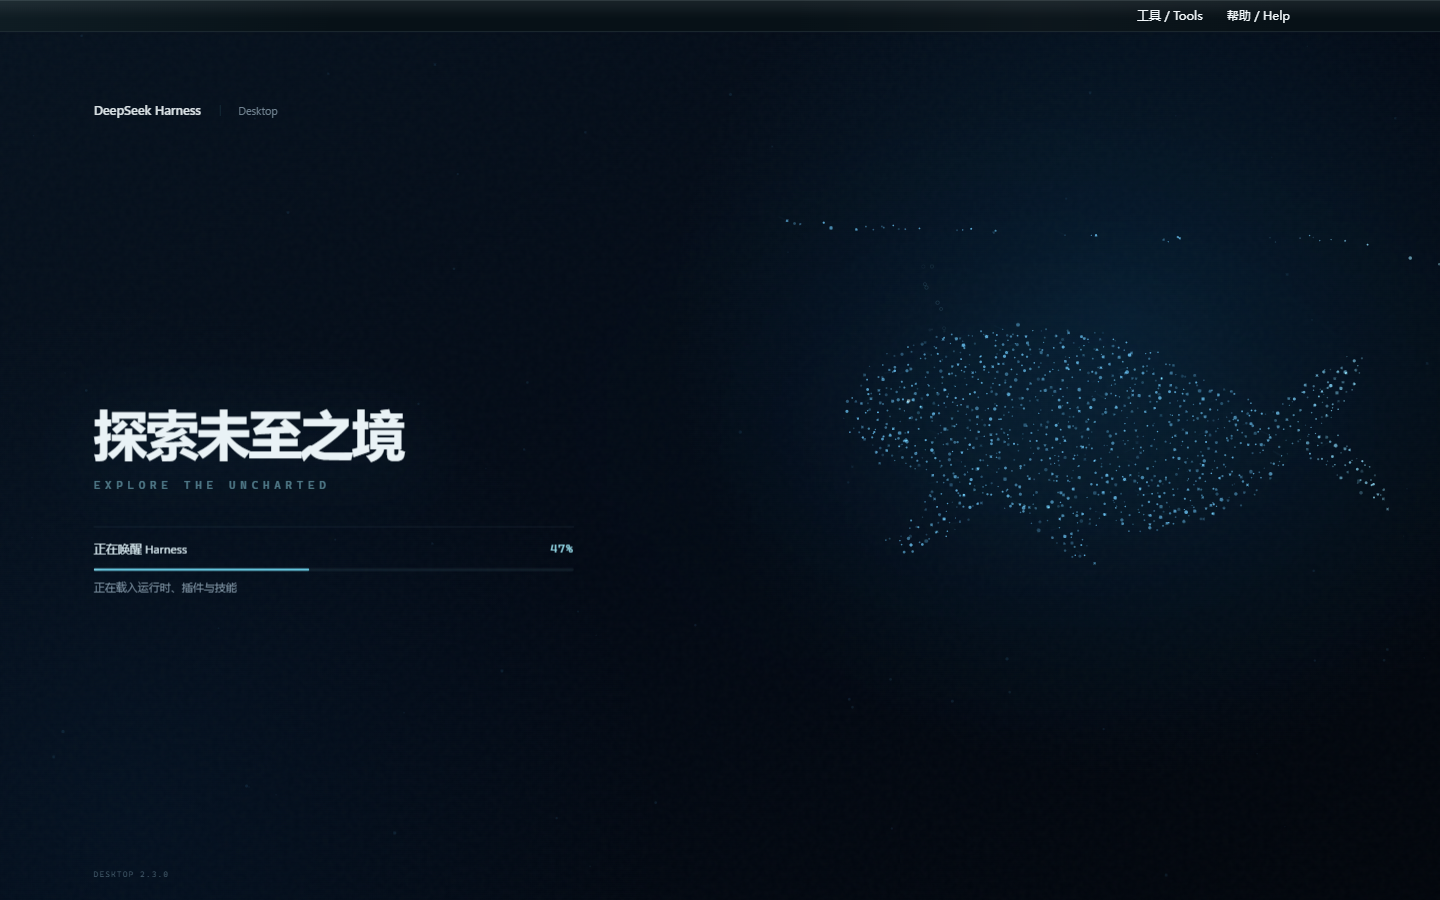 |  |
- 内置 dsh-web-ui 0.1.18 套件,保留任务看板、Git 图谱、右侧面板、SSH、移动端远程、实时统计、宠物,并加入独立的全页粒子主题、图像描述与量身 Agent;
- 内置腾讯官方 QQ Bot,可在扩展坞扫码绑定 QQ 私聊与群聊,无需编辑 YAML 或打开后台终端;
- 内置 ChatGPT OAuth、OpenAI Codex 模型与推理强度滑块,登录使用系统浏览器,凭据保存在本机;
- 独立
desktopprofile,不覆盖既有 DSH 配置,运行时仅监听回环地址; - 内置崩溃恢复、日志脱敏与轮转、窗口状态恢复、严格导航与权限策略;
- 内置 GitHub Release 更新检查,发现新版后在后台下载,完成后再由用户阅读说明并确认重启安装;
- 扩展坞支持社区 DSH bundle 安装/回滚、内置插件市场,以及项目、DSH、Agents 技能发现与安全导入;
- 安装包自带官方 DSH、pnpm 与原生依赖,无需另外安装 Node.js。
桌面版已预装任务看板、Git 图谱、右侧面板、移动端远程、远程连接、鲸鱼娘宠物、全页粒子主题、实时令牌统计、Codex Connect、推理强度滑块、插件市场和皮肤中心。下载安装 EXE 即可使用,不需要另外安装 DSH、Node.js 或执行插件命令。
功能插件
QQ 机器人扫码接入(桌面版 0.1.6)
桌面版内置腾讯官方 @tencent-connect/dsh-qqbot 0.3.0 和 @tencent-connect/qqbot-connector 1.2.0。在扩展坞打开 QQ Bot 卡片即可获取自动刷新的二维码,使用手机 QQ 扫码后,QQ 私聊与群聊便可连接到本机 Harness;同时支持取消、重新绑定和彻底解绑。
未绑定时插件保持禁用,不会让隐藏的后台进程等待终端扫码,也不会拖慢 Web UI 启动。绑定成功后桌面端会自动启用插件并重启 DSH。AppSecret 由 Electron safeStorage 结合 Windows 系统凭据保护加密保存,不会发送到渲染页面、写入日志或明文进入 cordis.patch.yml;运行时只通过子进程环境注入。
Codex 模型与推理强度(桌面版 0.1.8)
桌面版内置 dsh-codex-connect 0.1.0-alpha.4.5,可在设置页通过系统浏览器完成 ChatGPT OAuth,并启用 OpenAI Codex 模型。它不会默认替换当前模型、接管全局搜索或启用远程图片工具;检测到已有 Codex Provider 时会保留现有配置,OAuth 凭据只保存在本机 DSH home。
内置 reasoning-slider 0.0.2,在模型选择器中只展示模型实际支持的推理强度,切换模型时会自动回退到有效档位。顶部帮助菜单同时提供 QQ 群二维码、一键加群与 GitHub 建议入口,所有外链均交由系统浏览器打开。
任务看板
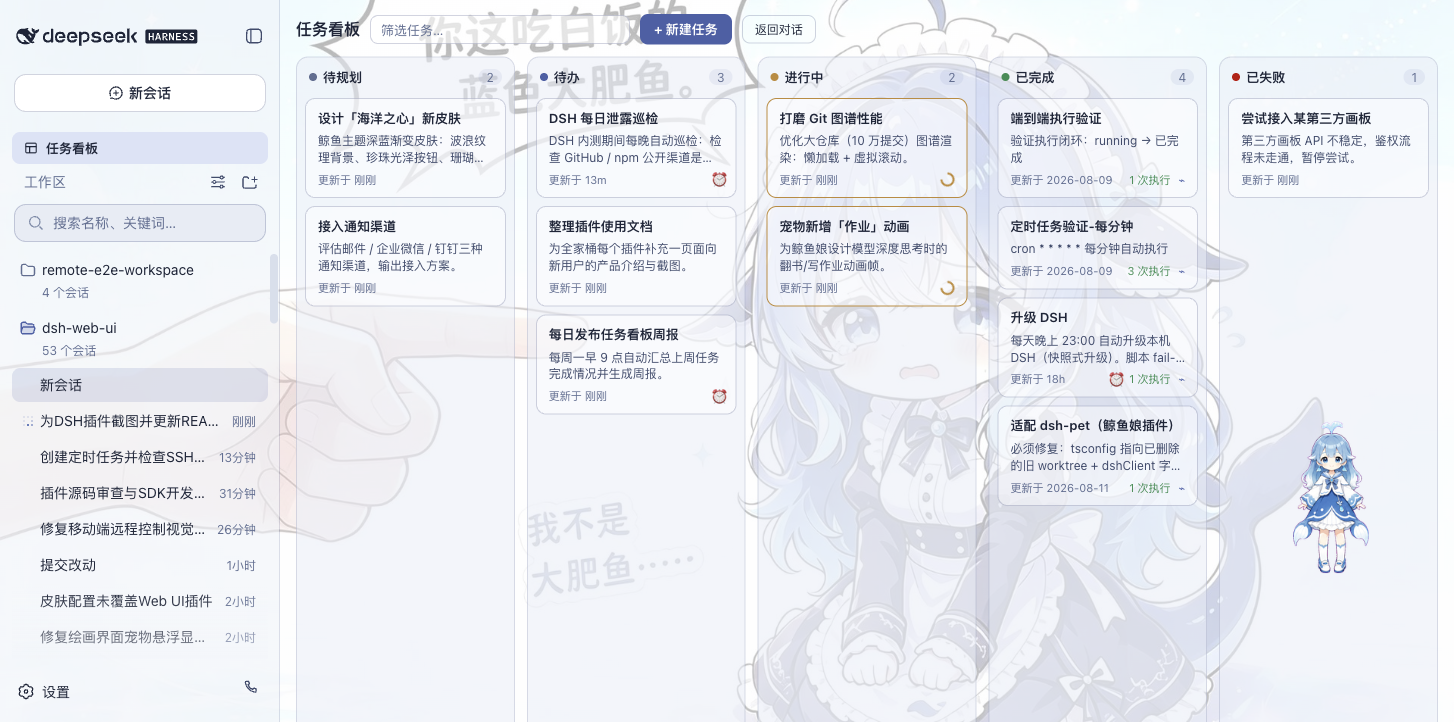
在侧边栏点击「任务看板」进入。任务按五列状态组织:待规划、待办、进行中、已完成、已失败。点击卡片上的「执行」,任务将由真实的 DSH 智能体会话执行,完成后状态自动回写;需要复盘时,可直接跳转到执行会话查看完整过程。
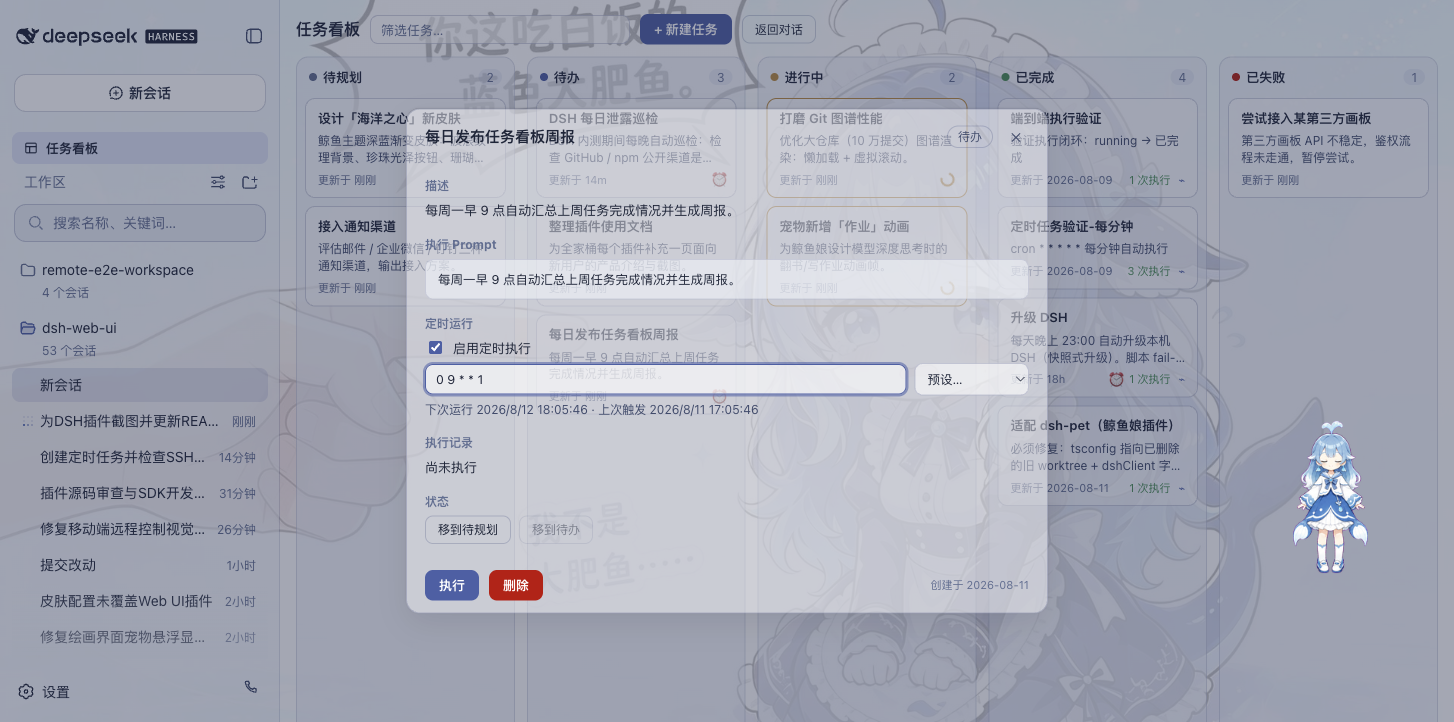
任务支持定时执行:在详情中配置 cron 表达式(如每天 23:00 自动升级 DSH、每周一 09:00 生成周报),页面保持打开时会在到点后自动开工。任务台账存于当前 DSH profile 的 Host 文件,浏览器旧数据在校验迁移后继续保留用于降级。
| 多列看板 | 定时执行 |
|---|---|
 |  |
Git 图谱
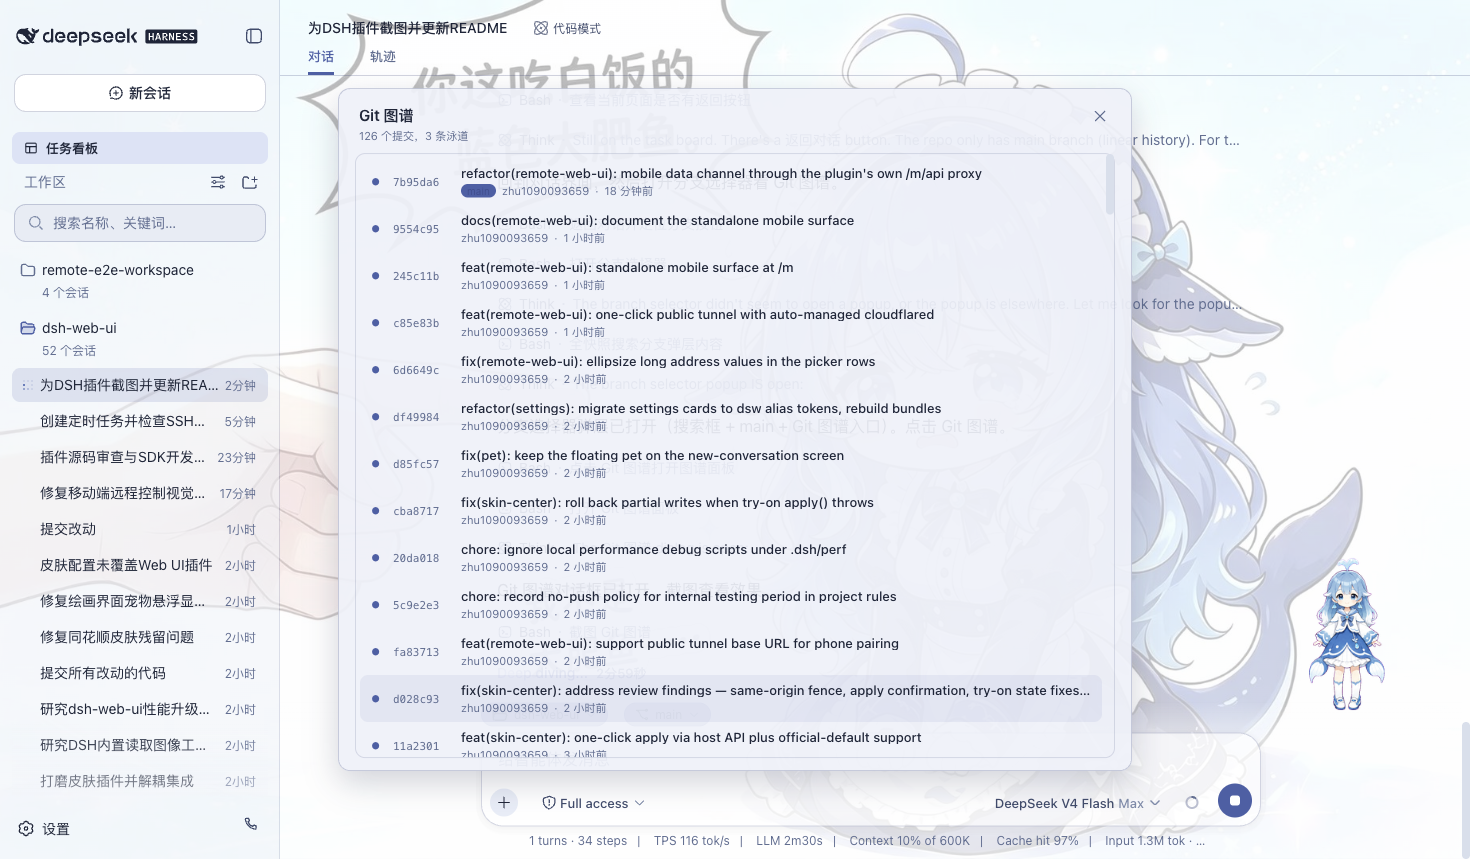
输入框上方的分支选择器,支持切换分支与查看提交历史;Git 图谱将分支泳道与提交历史可视化,仓库再大也能顺着时间线快速定位变更。
右侧面板
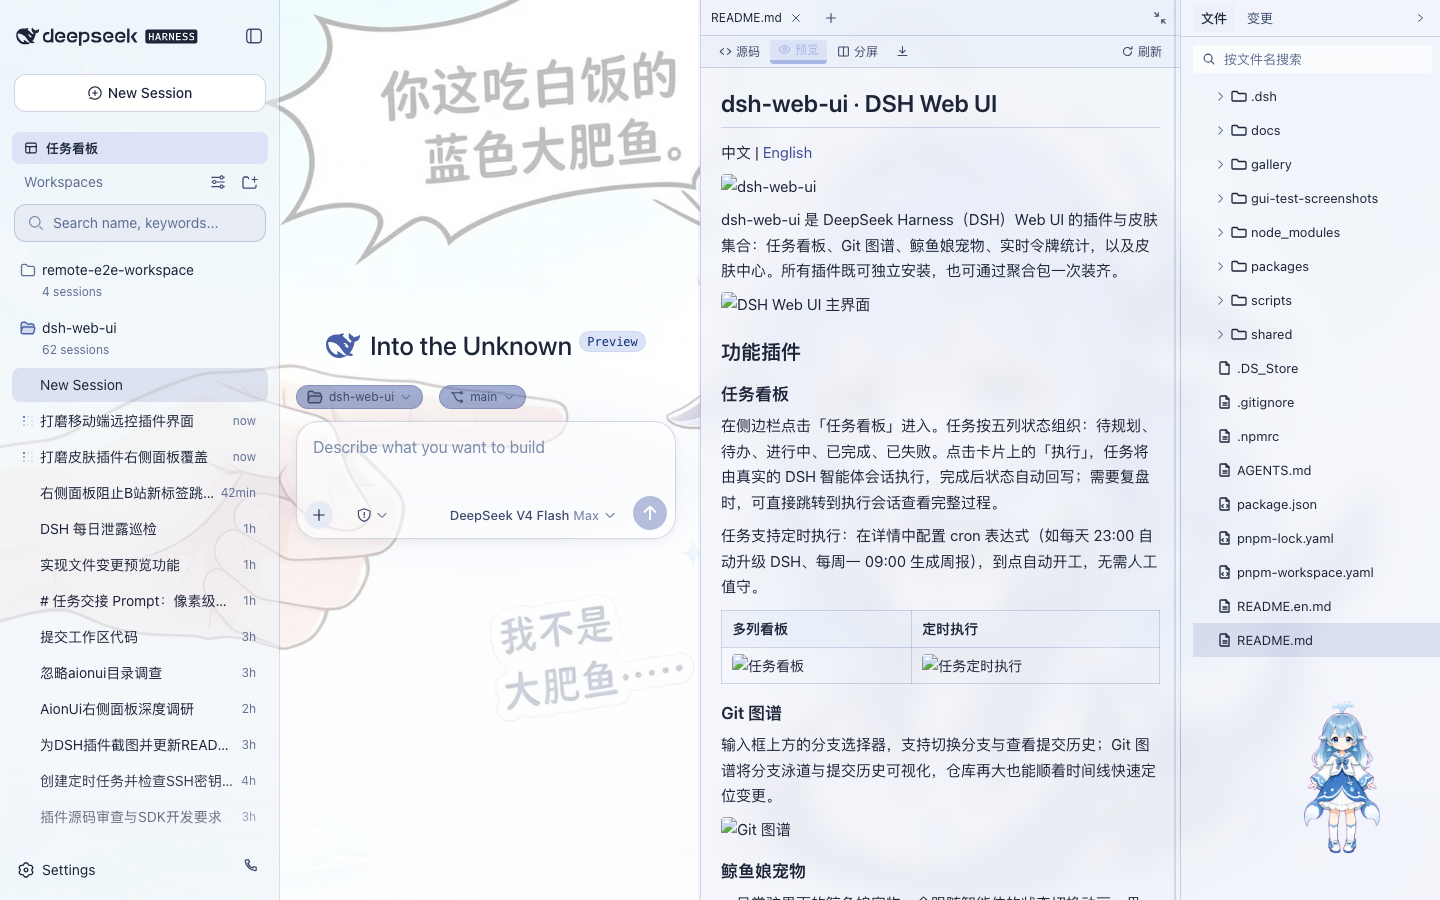
项目会话打开时,聊天区右侧出现「预览」与「文件/变更」两块面板:
- 文件树:浏览工作目录,点击文件即在预览面板打开,整行点击展开文件夹,支持按文件名搜索定位;
- 预览:多标签预览 markdown、HTML、代码、diff、CSV、PDF、Office、图片与文本等格式,支持源码 / 预览切换、分屏编辑与保存;
- 变更(SCM):真实 git 变更面板,支持 stage / unstage / discard;
- 面板宽度可拖拽调整,双击把手复位默认宽度,折叠状态与宽度按项目持久化;
- 11 款皮肤全部适配右侧面板,换肤后面板随之融入主题。
鲸鱼娘宠物
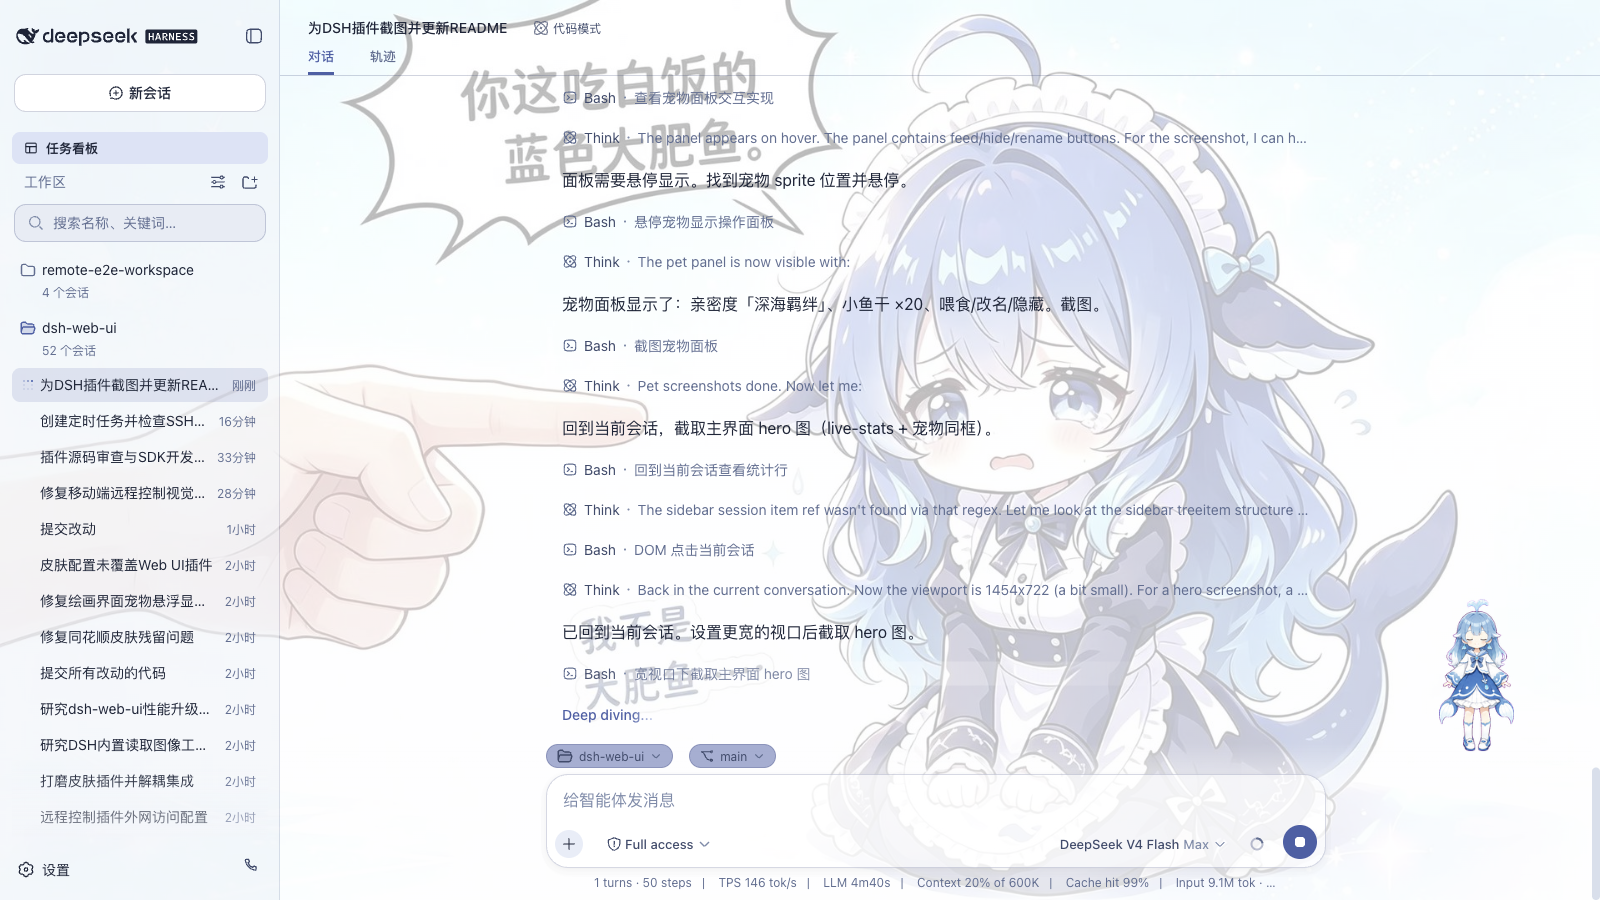
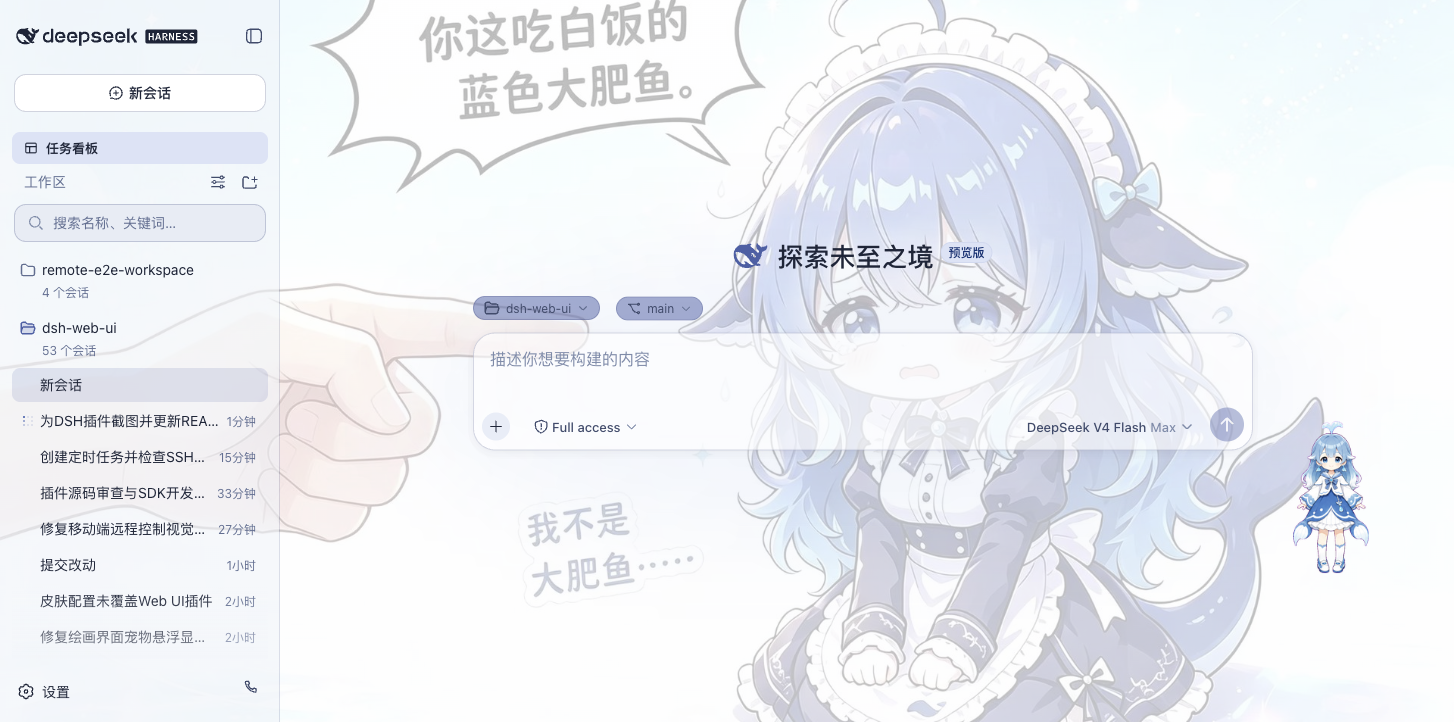
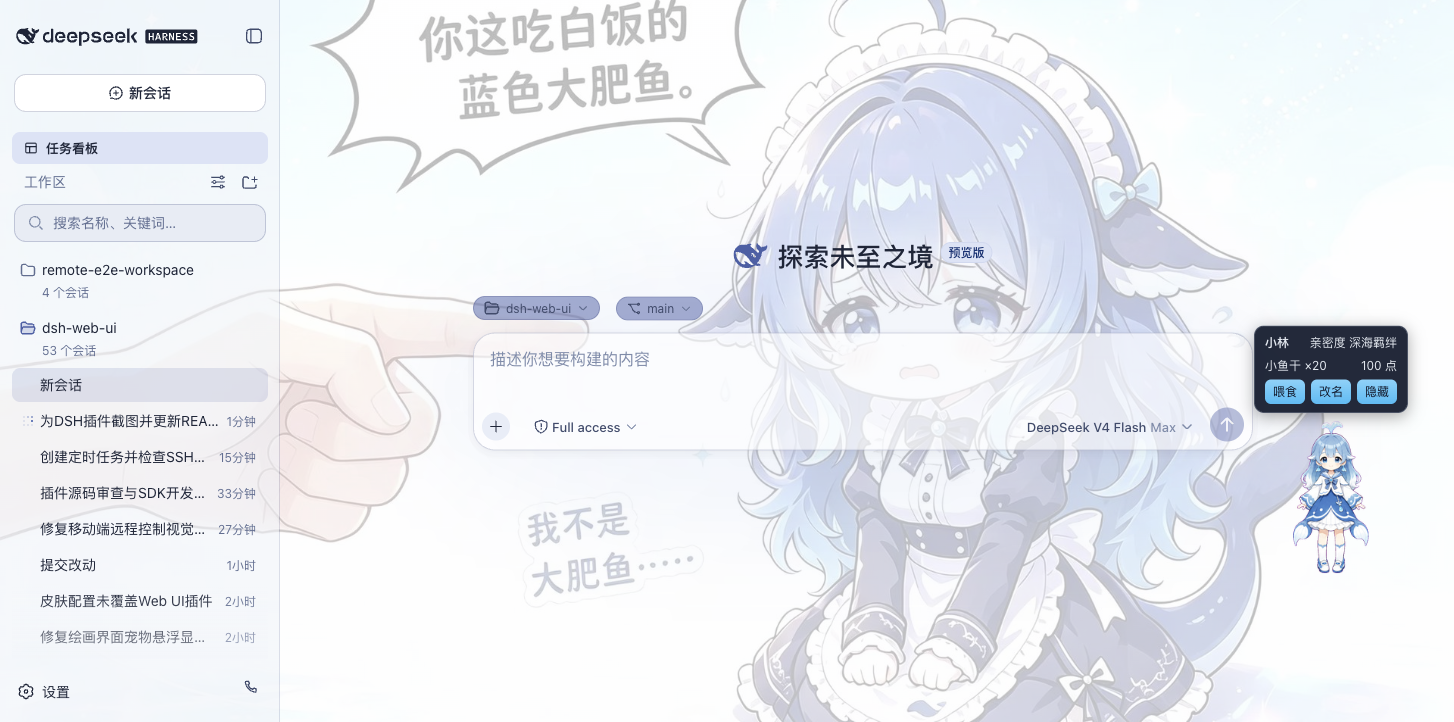
一只常驻界面的鲸鱼娘宠物,会跟随智能体的状态切换动画:思考、等待、工作、庆祝。点击可互动(摸头),投喂小鱼干可提升亲密度,陪伴度从幼鲸一路成长至「深海羁绊」。支持自定义名称、自由拖动位置,也可随时隐藏。
| 陪伴工作 | 互动面板 |
|---|---|
 |  |
实时令牌统计
在输入框下方实时显示生成速度(TPS)、LLM 耗时、上下文占用、缓存命中率以及输入 / 输出 token 数,每次生成的用量一目了然。

移动端远程
侧边栏底部的手机图标打开配对面板:扫码配对(或复制链接)后,手机进入独立的移动端界面,远程控制当前 dsh web 工作区——查看与新建会话、收发消息、切换模型与思考强度、调整权限预设,全部与桌面端同步。配对令牌一次性且限时,「停止」可随时吊销所有设备;二维码默认走局域网,也可开启 cloudflared 公网隧道,让手机在任意网络配对。
| 工作区列表 | 会话列表与新建会话 |
|---|---|
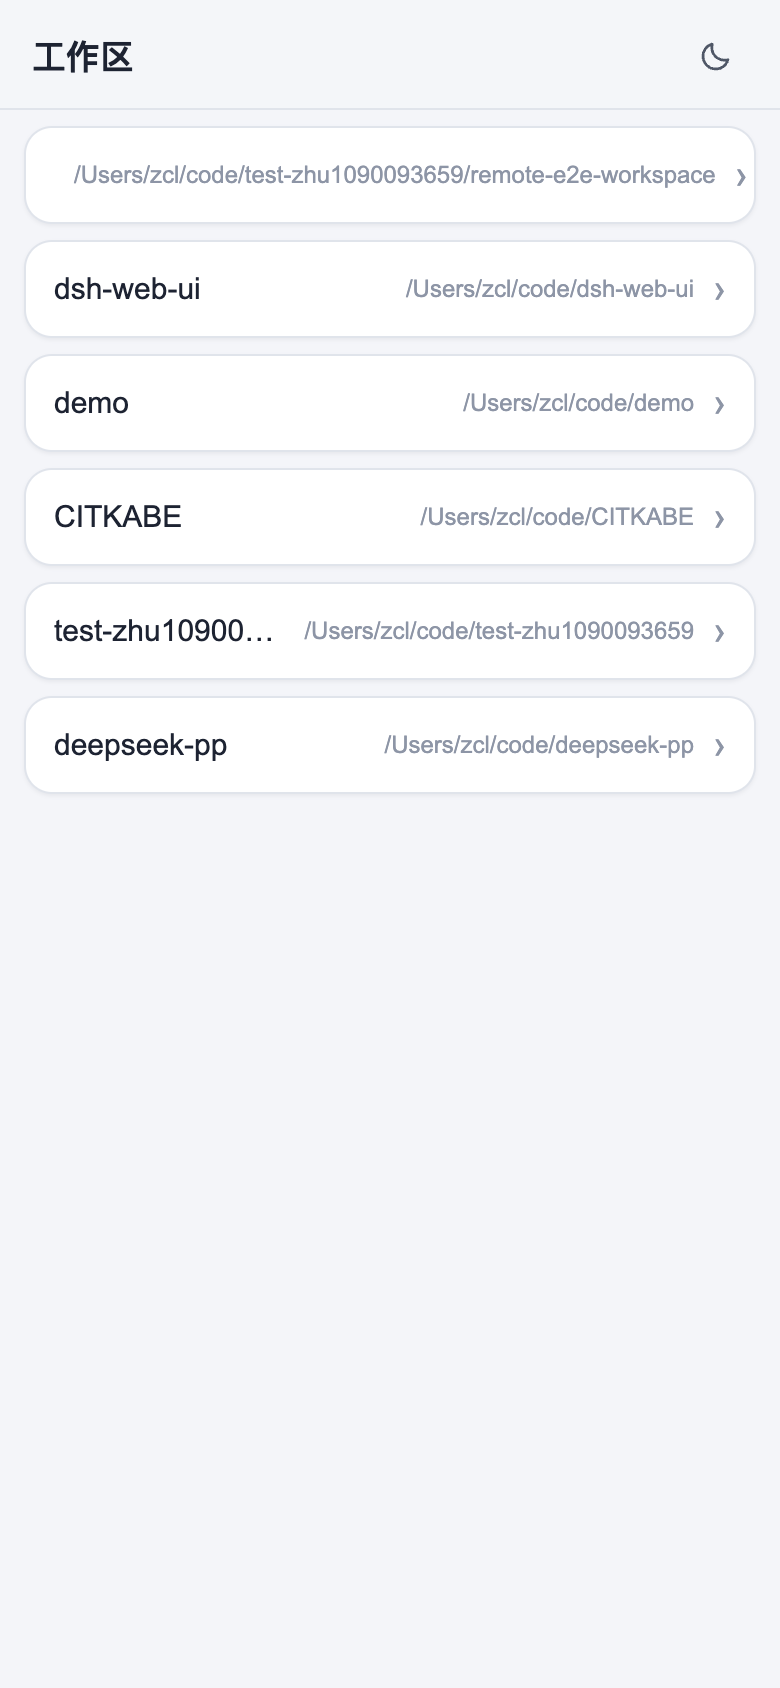 | 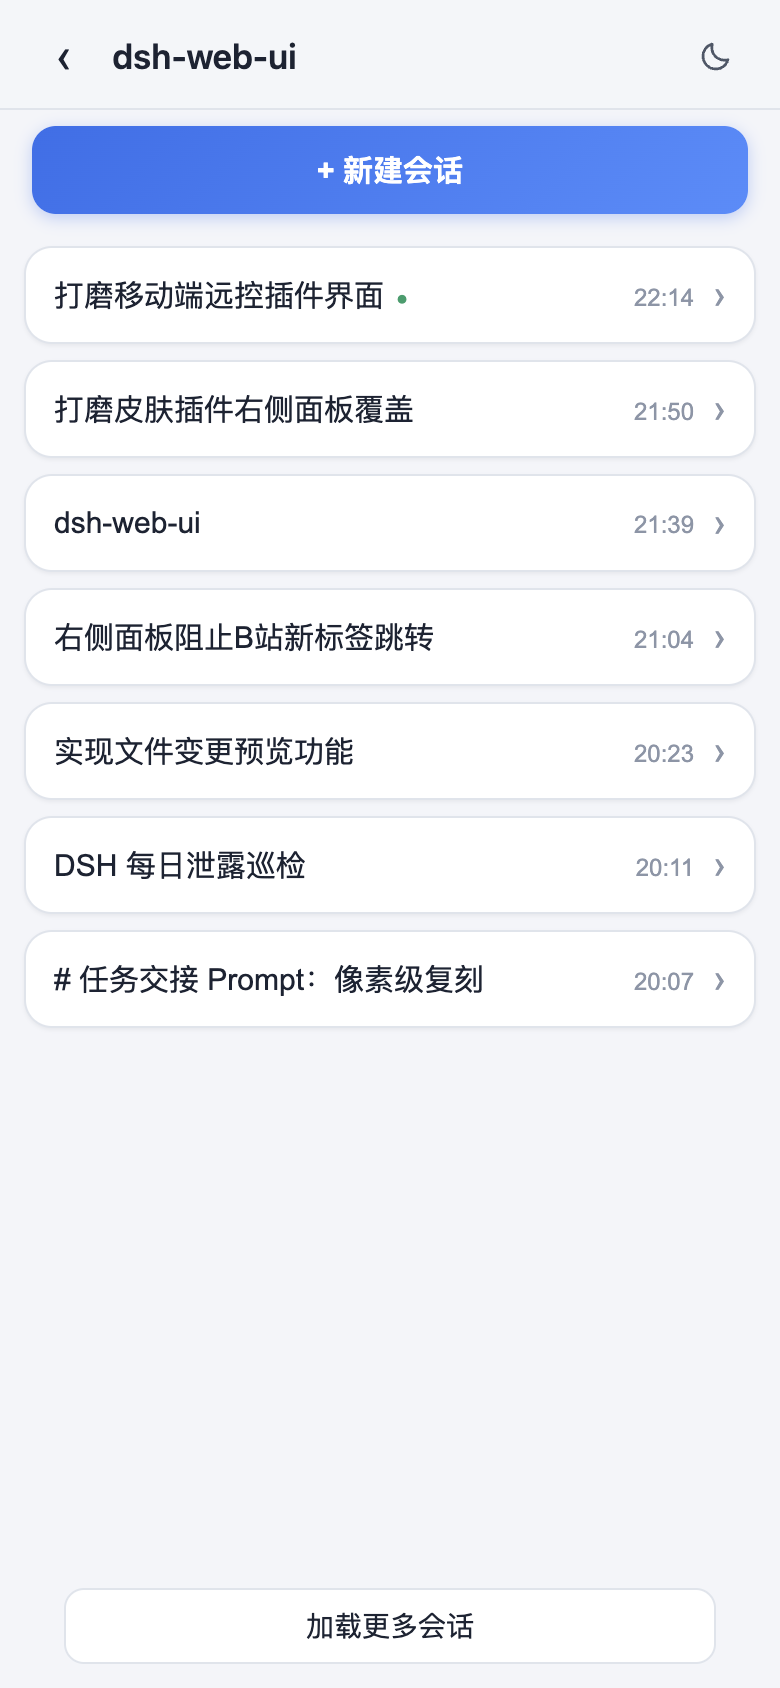 |
| 聊天(折叠的深度思考与工具调用) | 模型与思考强度选择 |
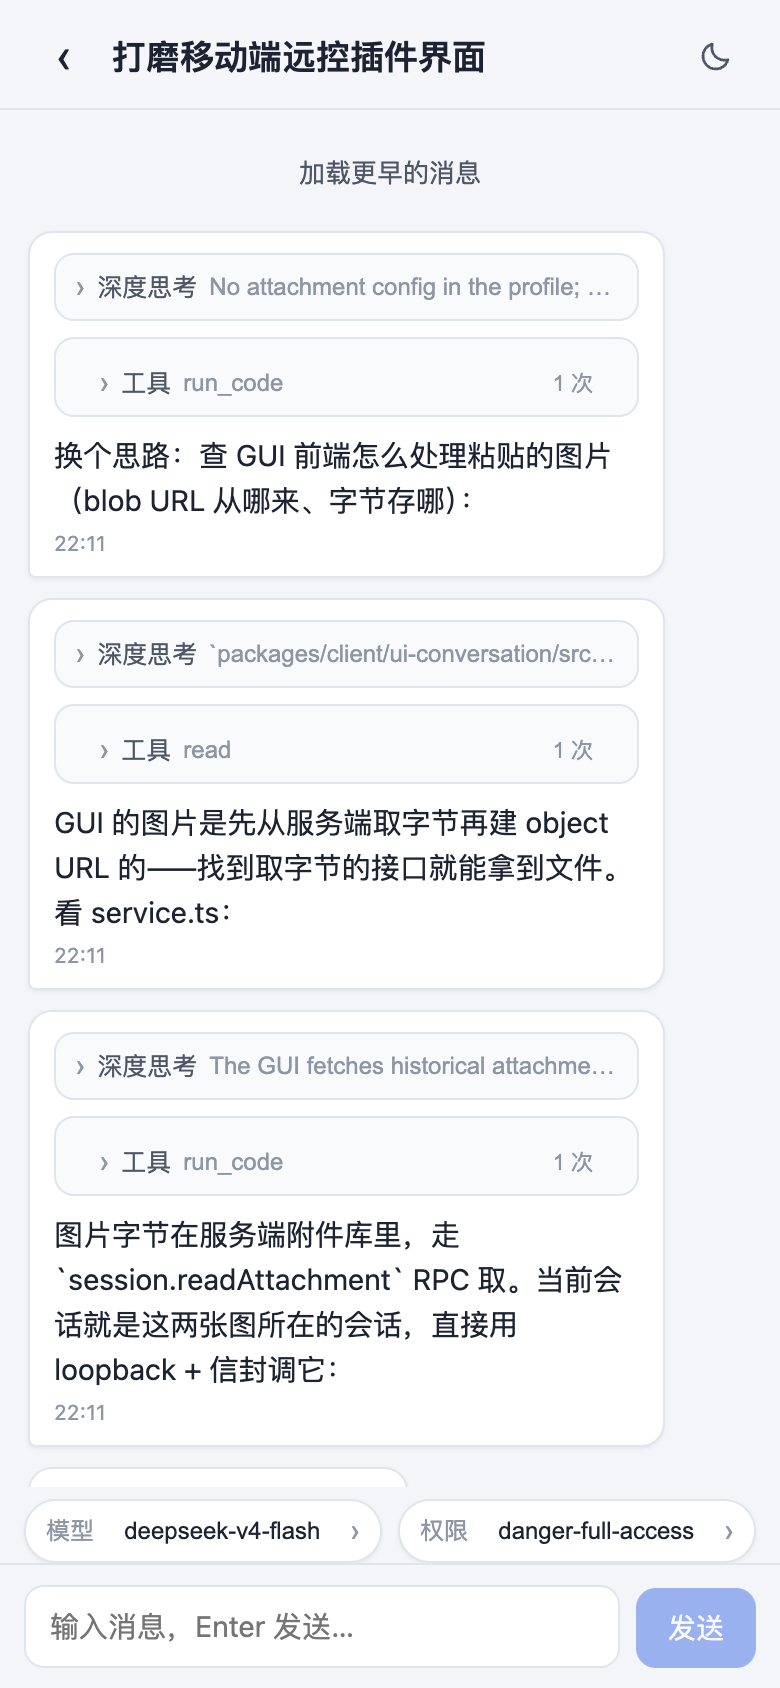 | 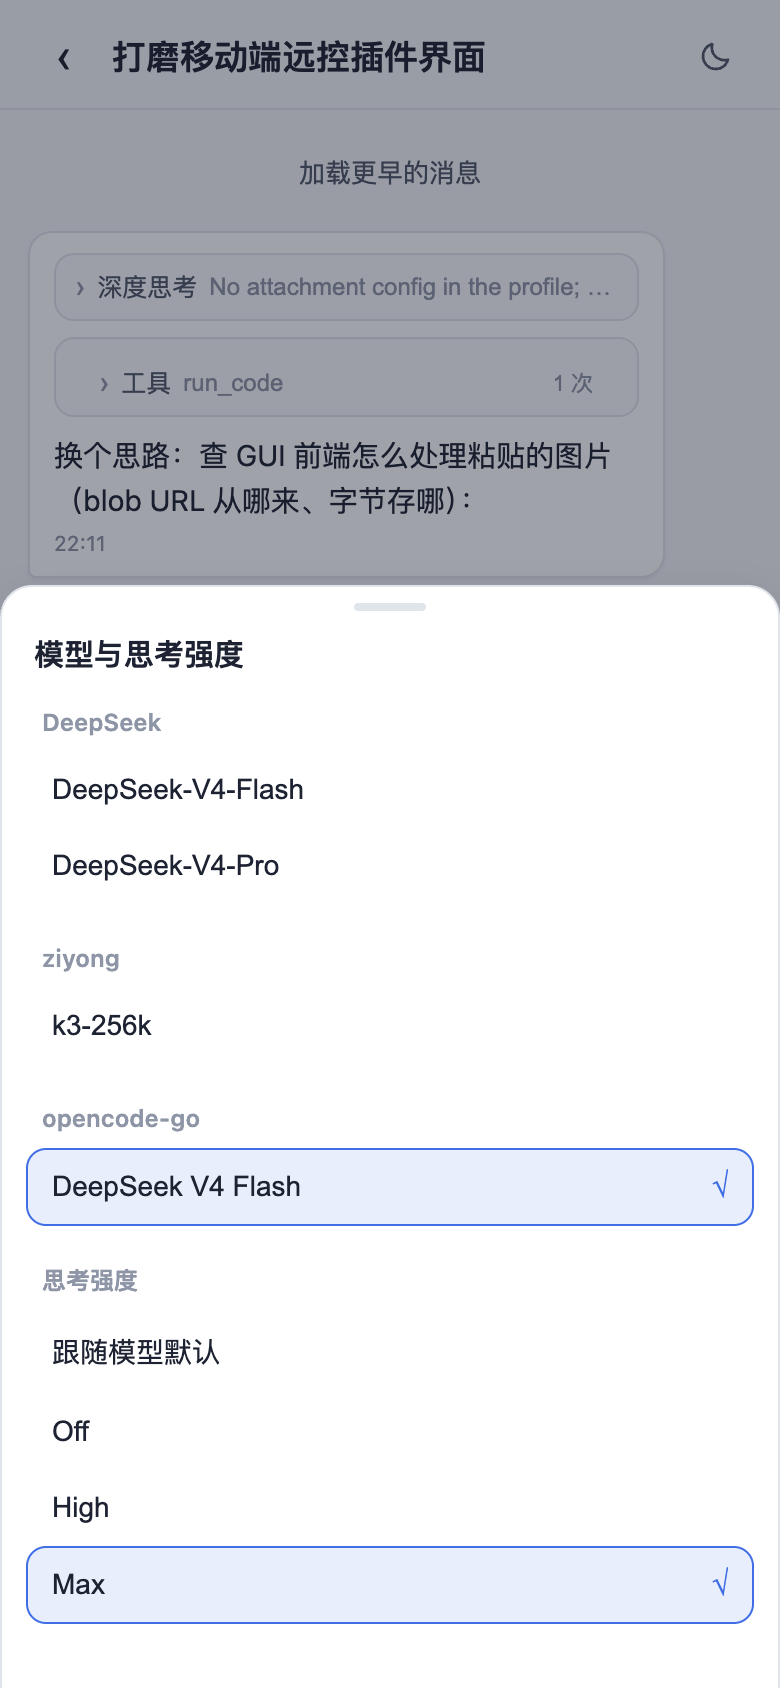 |
远程连接
侧边栏「SSH」入口打开远程运维面板。主机支持密钥 / 密码认证,可从 ~/.ssh/config 一键导入;配置统一存于 ~/.dsh/dsh-ssh.json。对已配置主机可执行真实操作:
- Web 终端:xterm.js 远程终端,实时输出、随窗口自适应;
- 文件传输:SFTP 上传 / 下载,带进度条与远程目录浏览;
- 端口转发:本地隧道直达远程内网服务(数据库、API、管理后台),仅监听 127.0.0.1;
- 集群执行:一条命令并发跑多台主机,按别名 / 环境 / 标签过滤;
- Agent 直连:Agent 与面板共享同一份主机配置,对话中直接说「连一下 xxx 看看状态」即可由智能体执行远程命令。
设置中心
全部插件的开关与参数统一收纳于「设置 > 插件配置」,修改即时生效。桌面版会明确开放移动端远程控制、皮肤中心、实时令牌估算、任务看板、宠物和粒子主题六张配置卡,不会因 DSH Host 的设置命名空间过滤而缺项。设置窗口本身可拖动、从边缘或角落缩放,并会记住上次位置和尺寸;小窗口与高 DPI 下会自动重排和滚动,避免内容重叠或移出屏幕。
插件市场与扩展坞
桌面 profile 只内置 dshmarket 1.3.0 作为默认插件市场。市场安装目标固定为隔离的 desktop profile,支持社区 DSH bundle 的发现、安装、事务回滚和保留升级;运行时重启由桌面宿主统一管理,避免市场自行启动第二个 DSH 进程。项目技能、DSH 技能与 Agents 技能也可在扩展坞中发现并经过安全检查后导入。
皮肤
皮肤中心提供 11 款可选皮肤(含 Harbor 与 QQ2006),均支持先试穿再应用:试穿即时生效、退出完全还原,确认满意后一键应用。
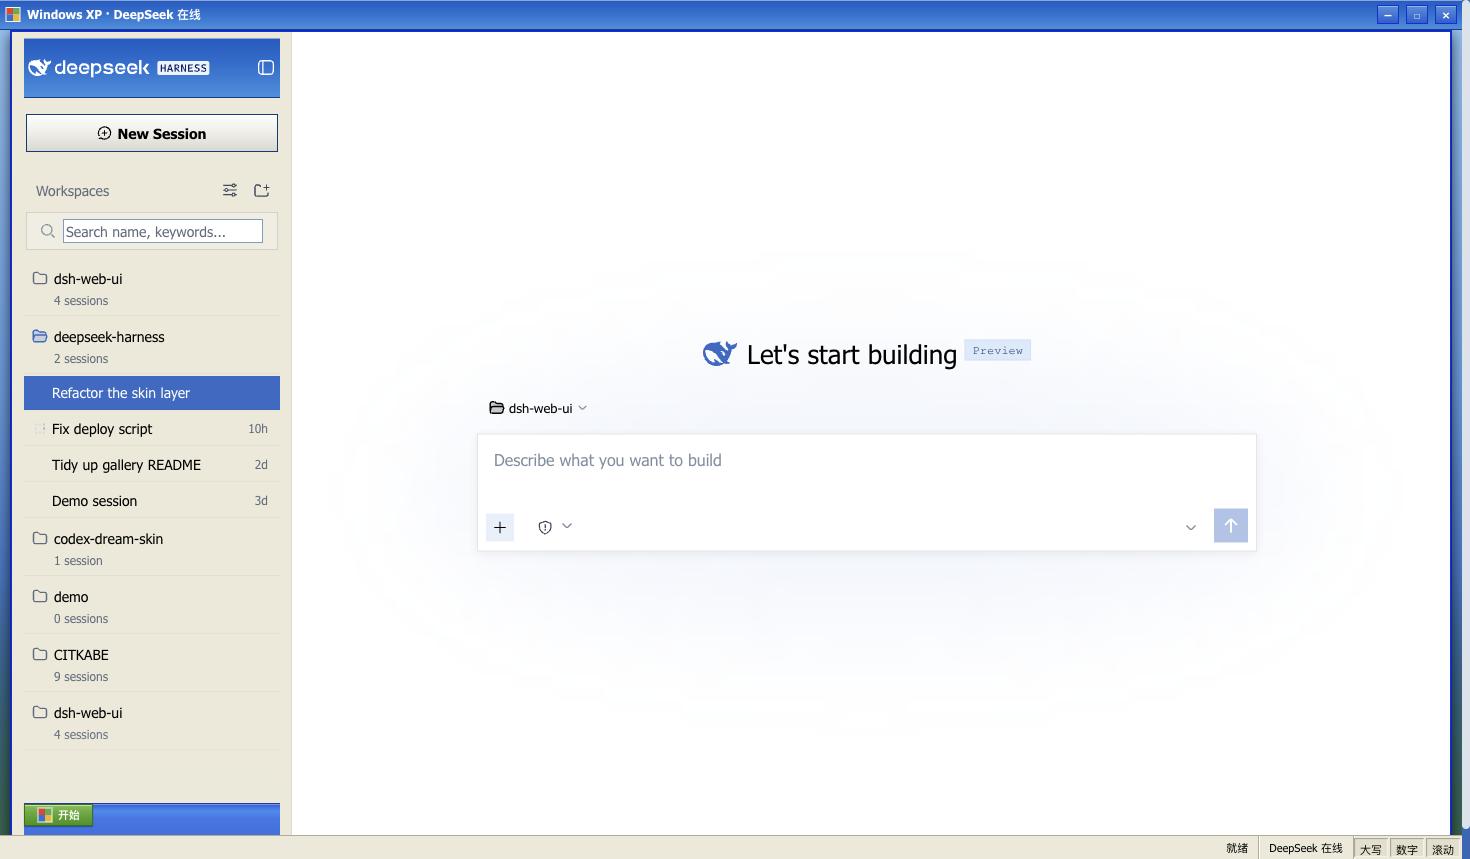
Windows XP(Luna)
还原 Luna 经典界面:蓝色渐变窗口条、绿色「开始」按钮、Bliss 蓝天桌面,全局直角风格。
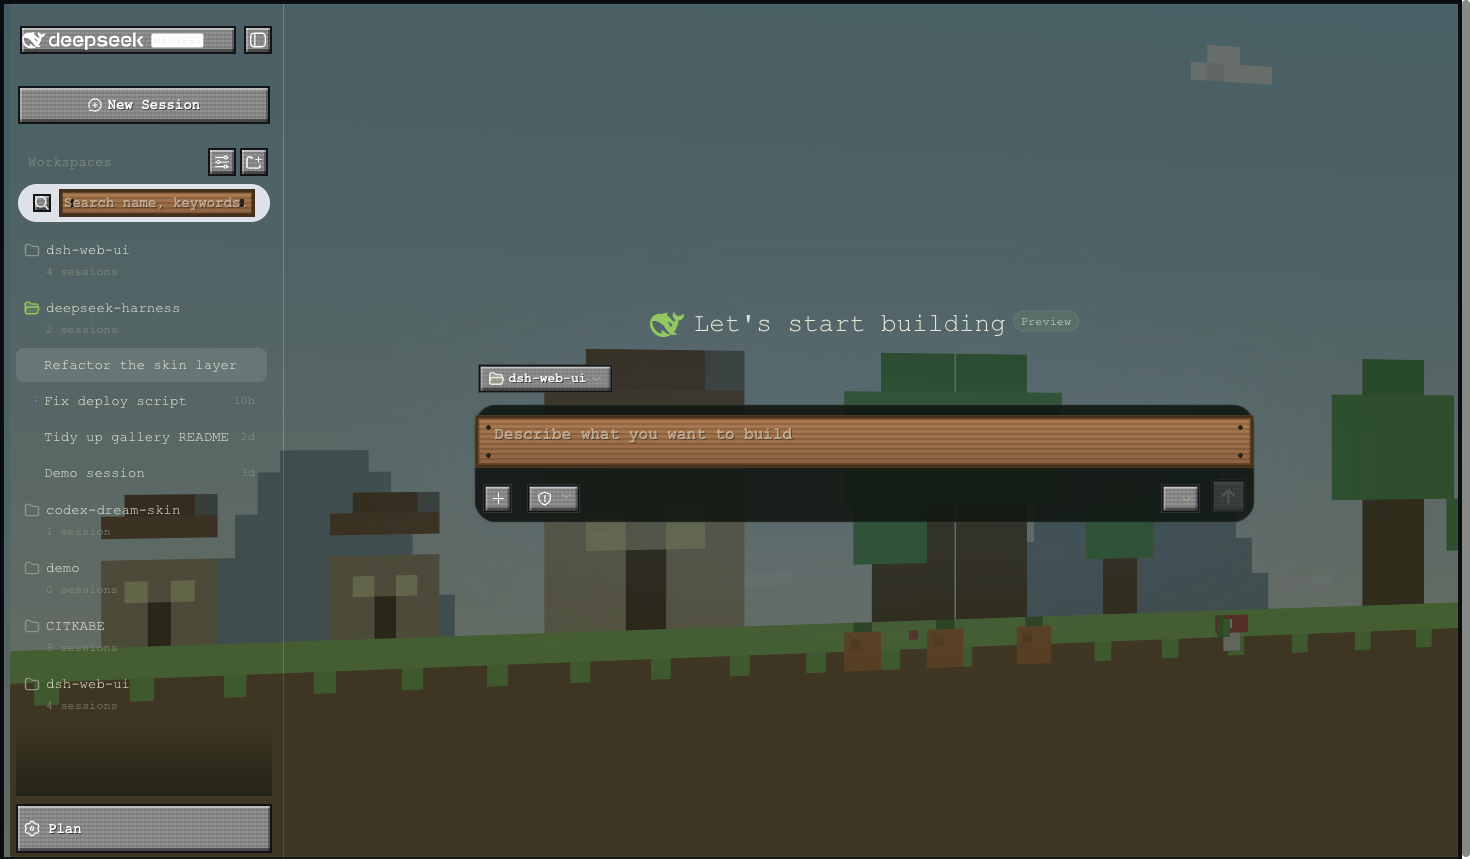
Minecraft 方块世界
以《我的世界》主界面为灵感:像素全景天空盒在界面后方缓慢旋转,按钮为灰石板样式,输入框为木告示牌样式。
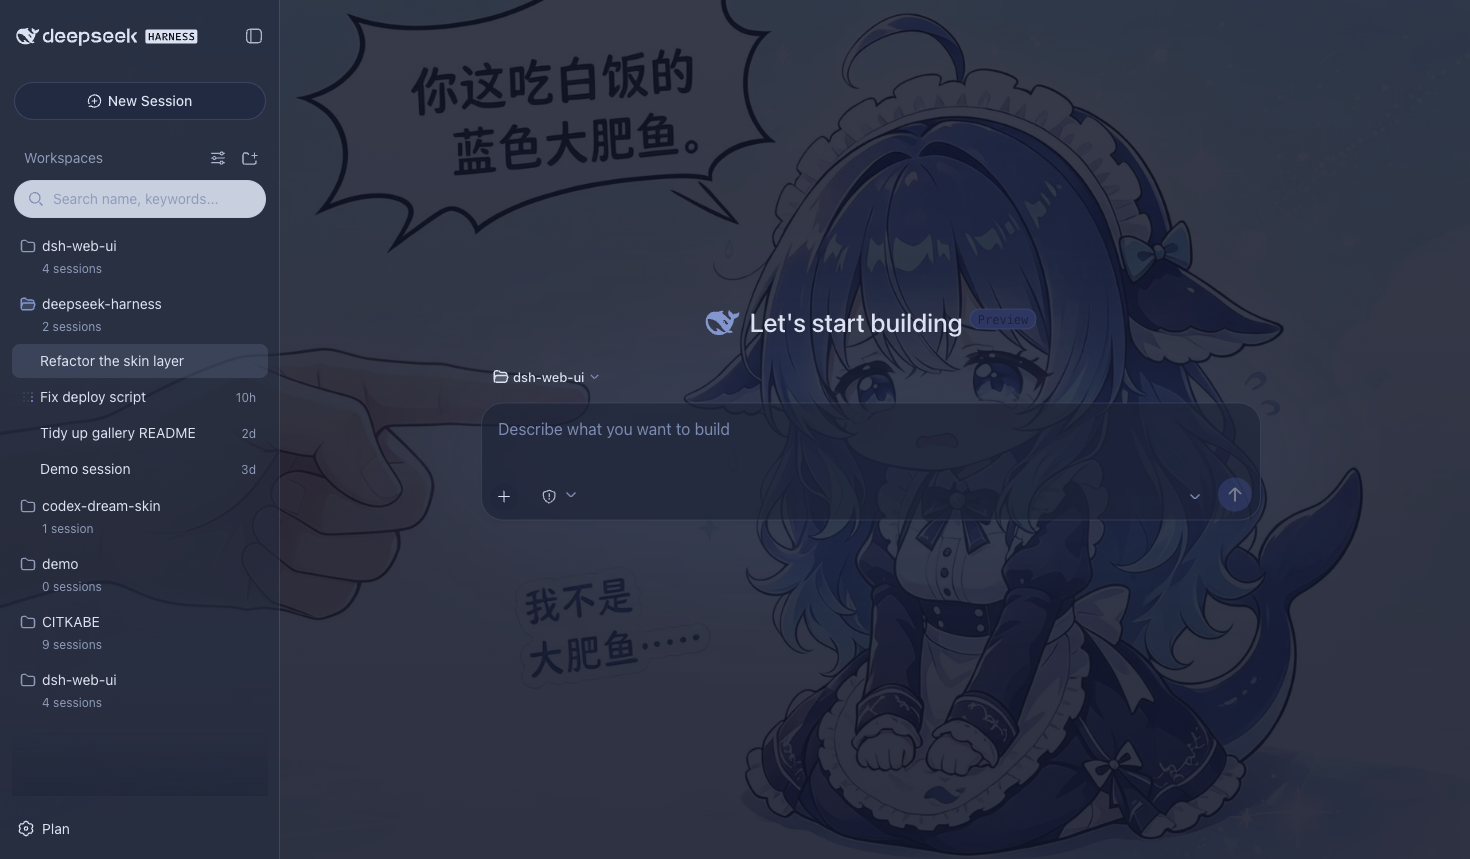
Blue Fantasy 蓝色幻想
鲸鱼插画铺于半透明面板之下,靛蓝色调色板贯穿全局,暗色主题下效果尤为突出。
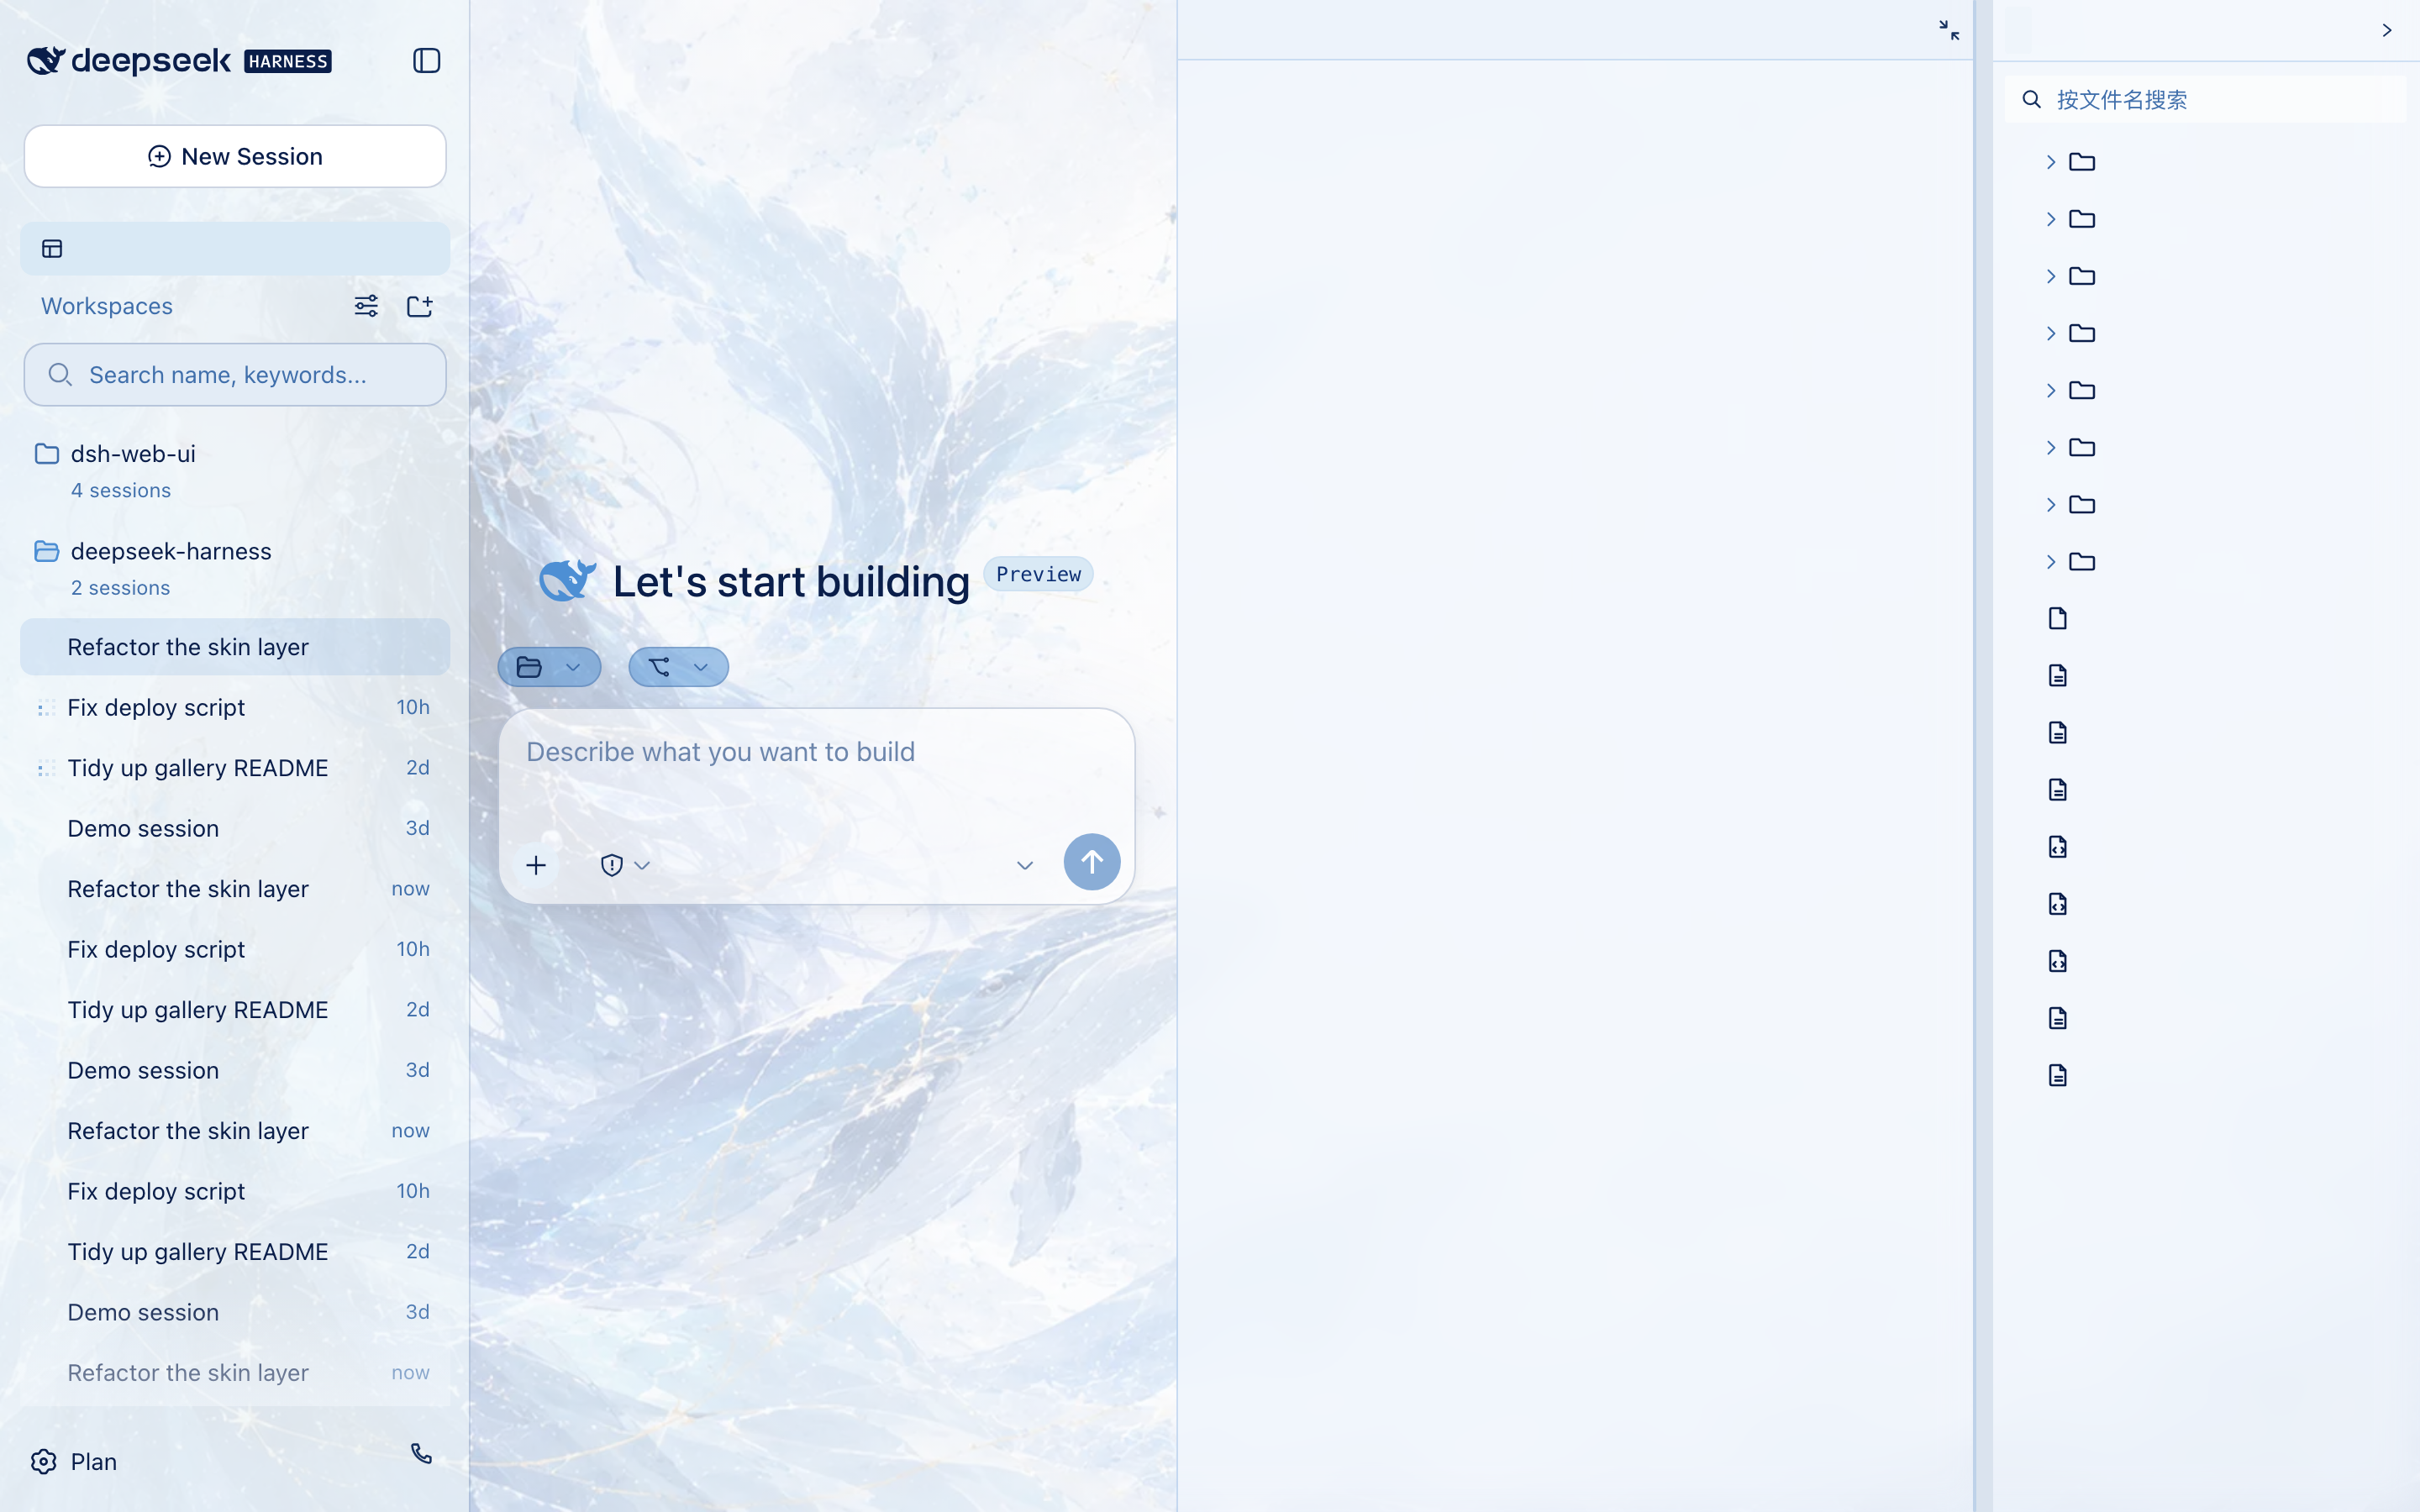
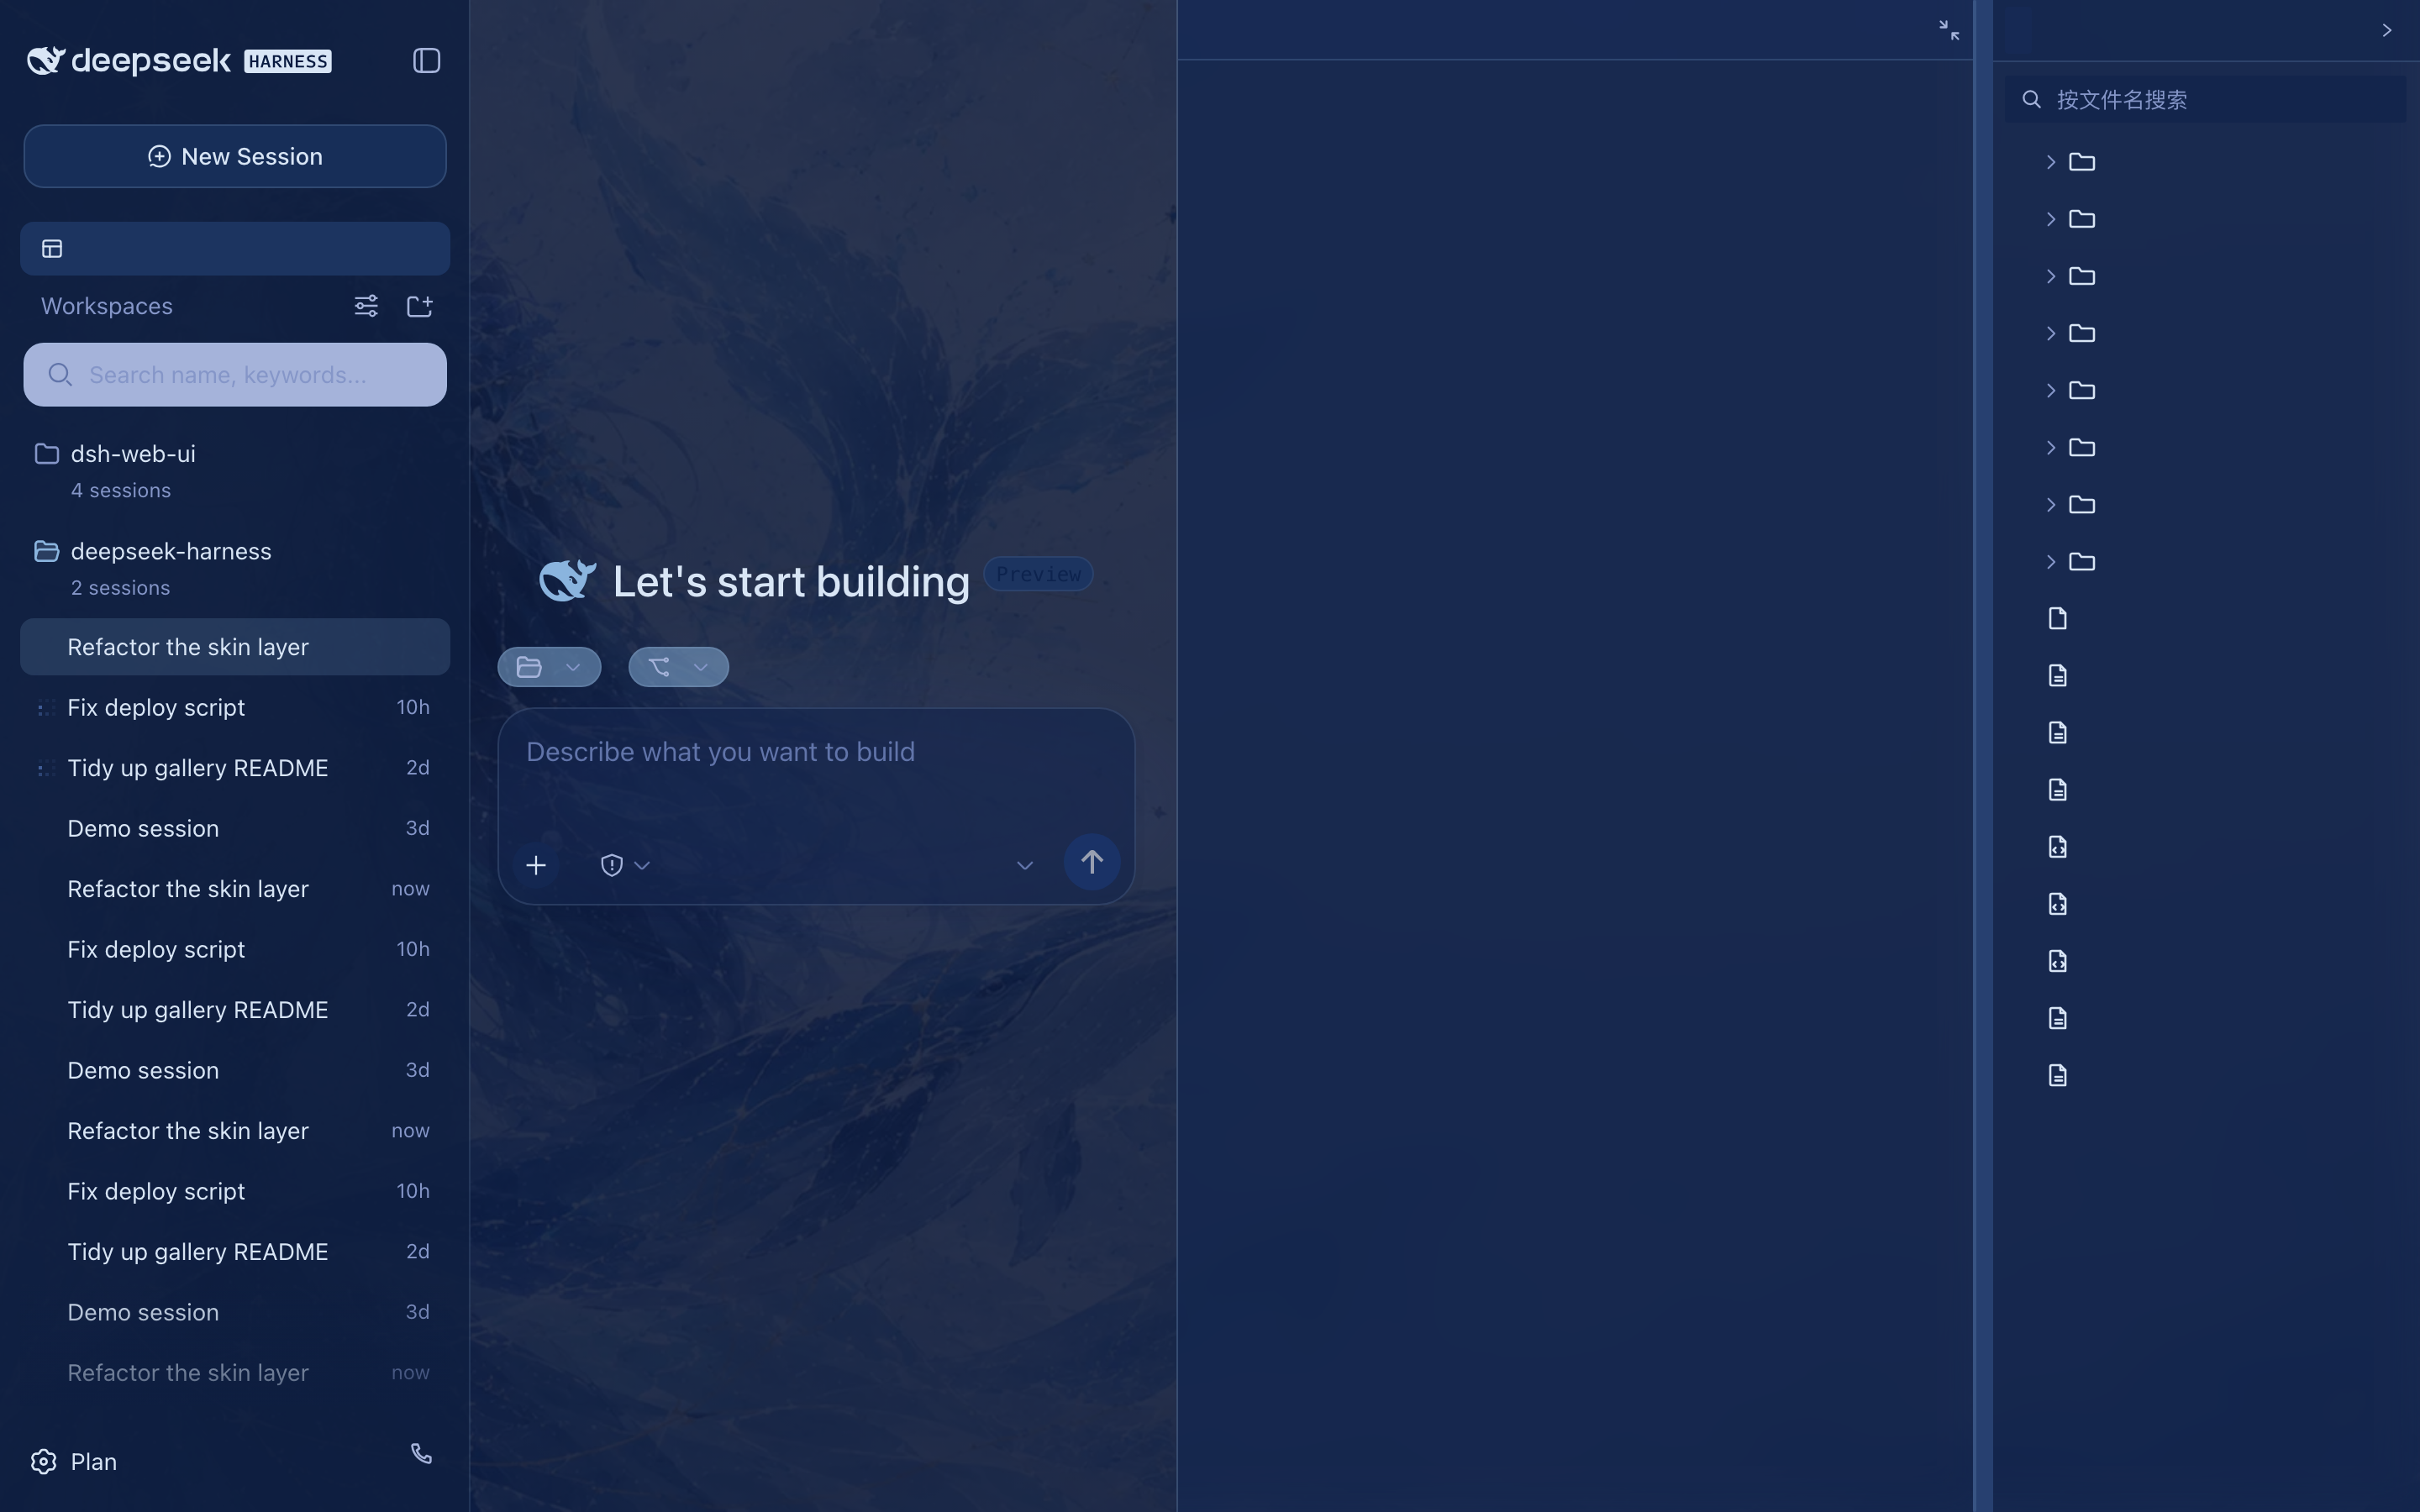
鲸吟(Whale Song)
深海鲸语女神主题:无文字纯氛围背景画(蓝发女神与鲸群居左、冰蓝星座网格与金色细线点缀、右侧大量留白)垫在半透明面板之下,冰蓝 / 浅青 / 深海军蓝 / 钴蓝冷色体系贯穿全局,暗色变体为深海夜航调。
 ·
· 
初音未来(Miku)
电子歌姬主题以青蓝音符、声波状态栏与半透明舞台面板重塑完整界面,同时保持亮色、暗色模式和功能插件可读性。
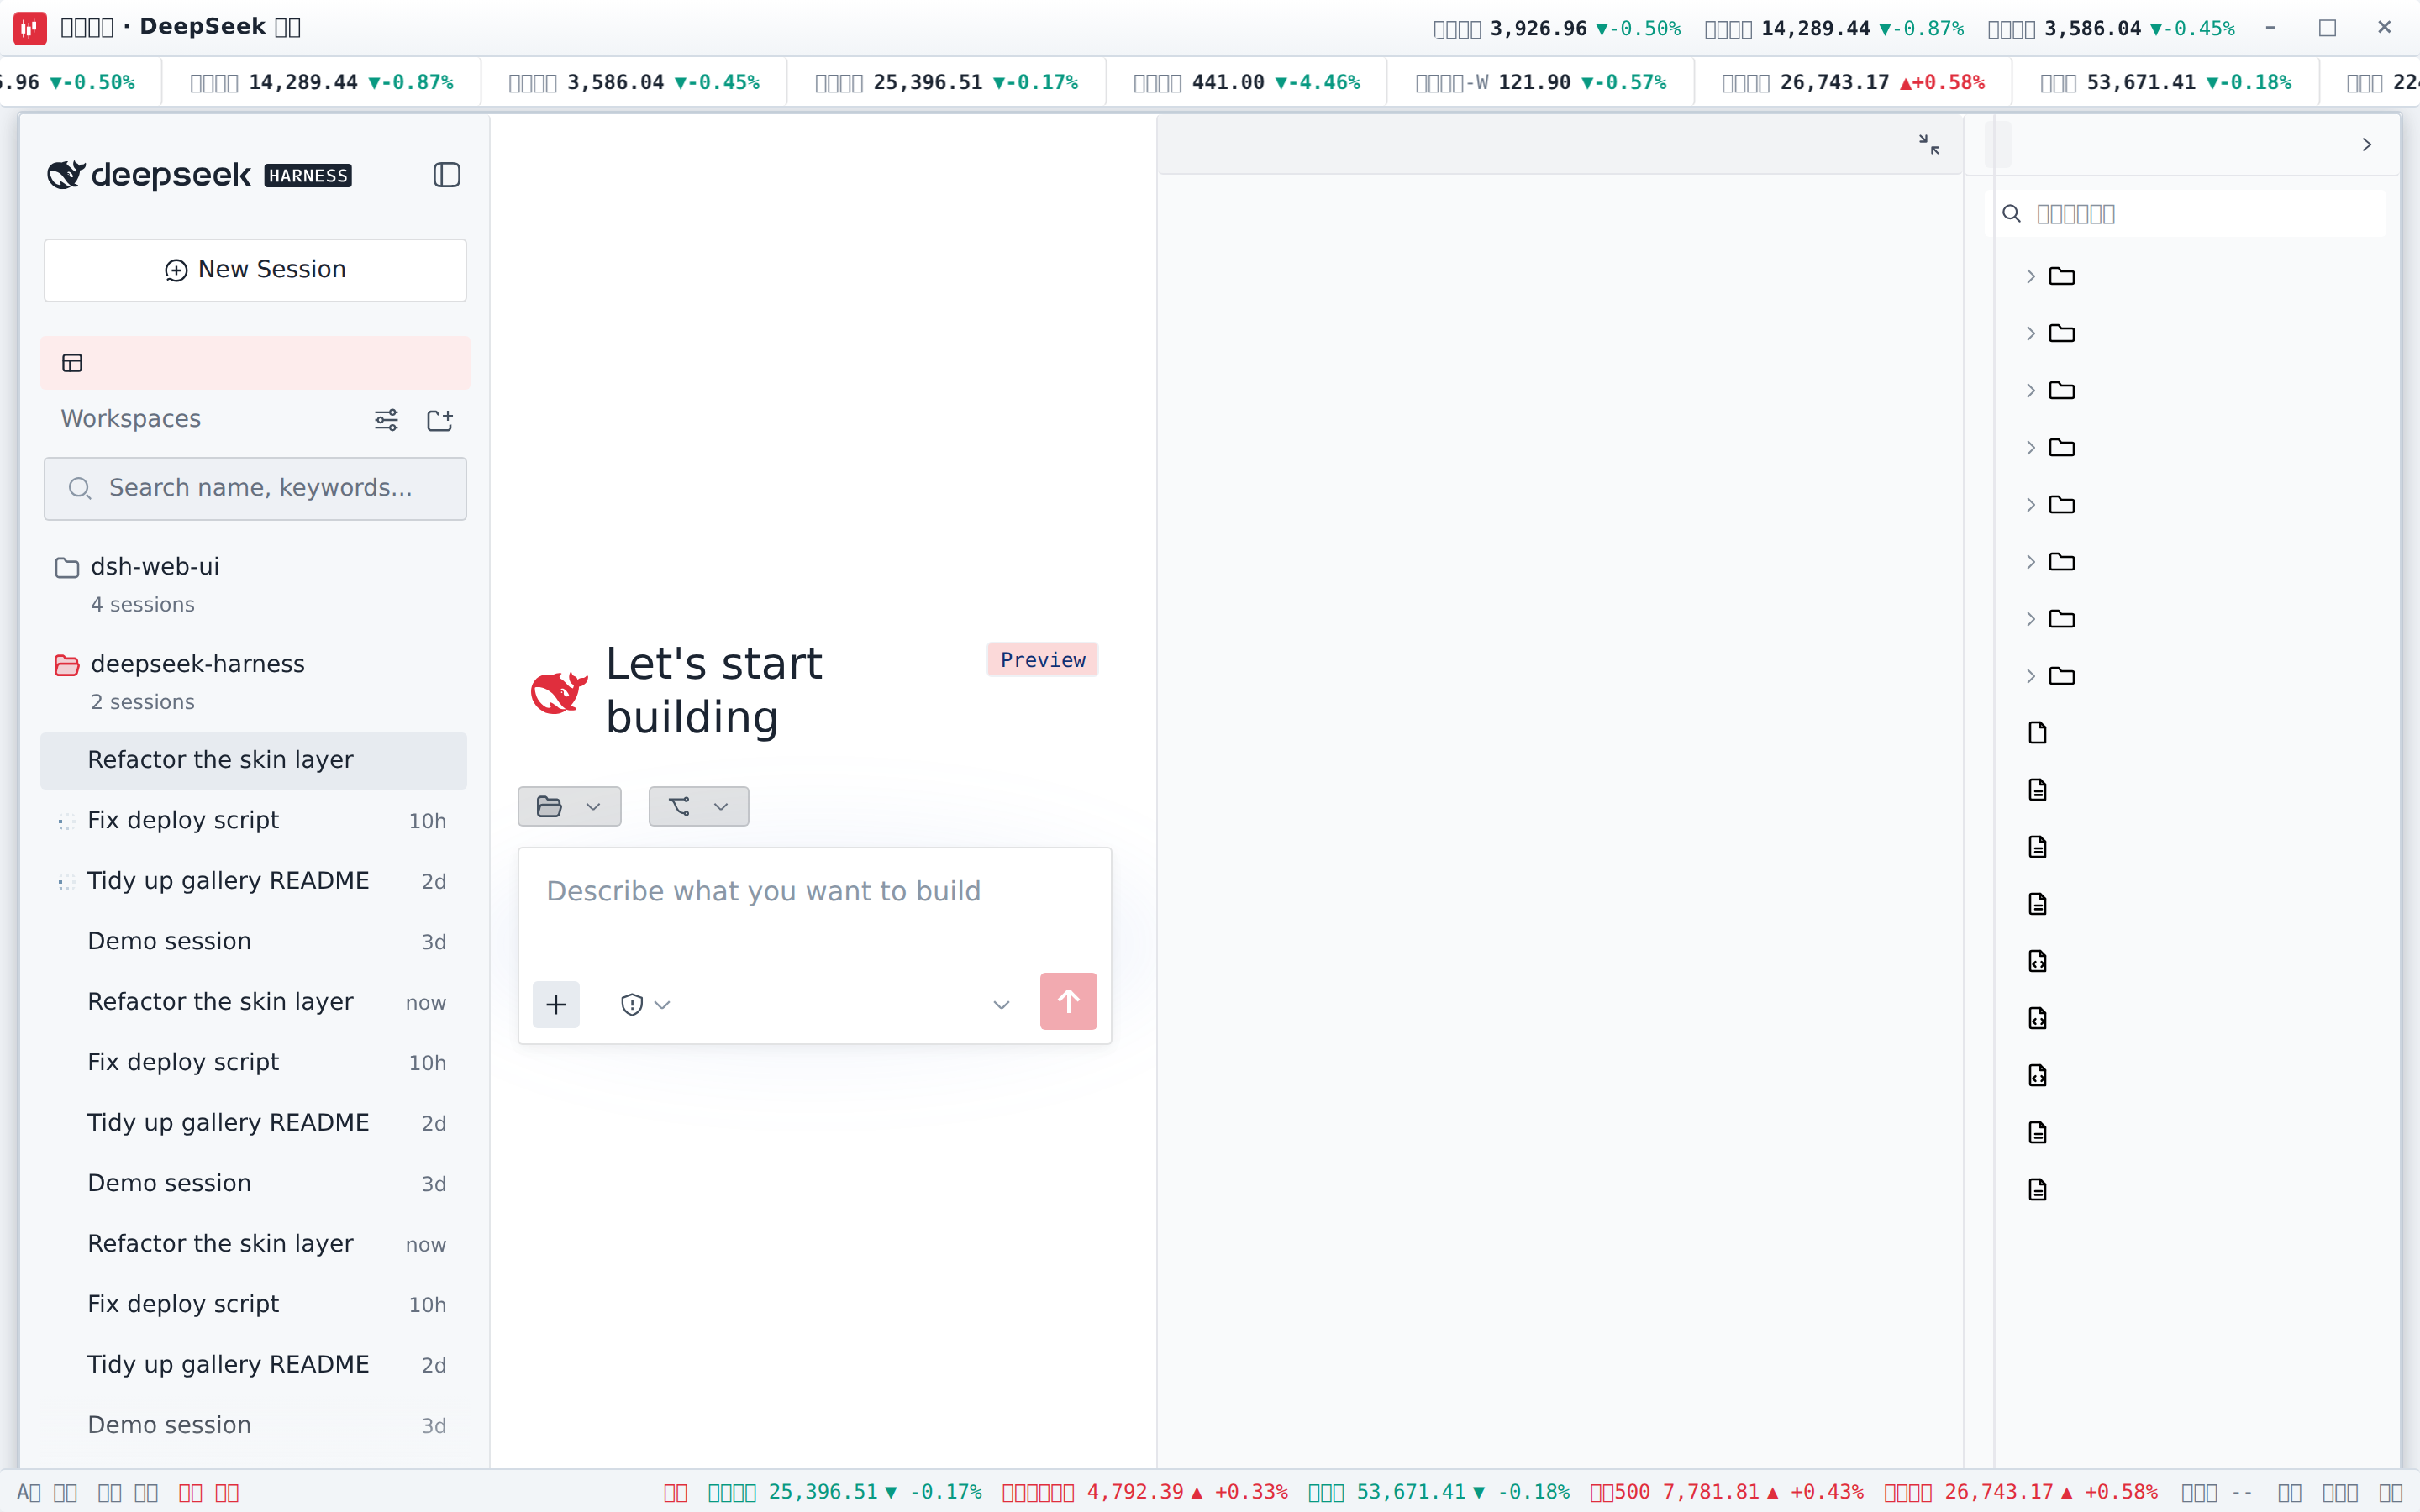
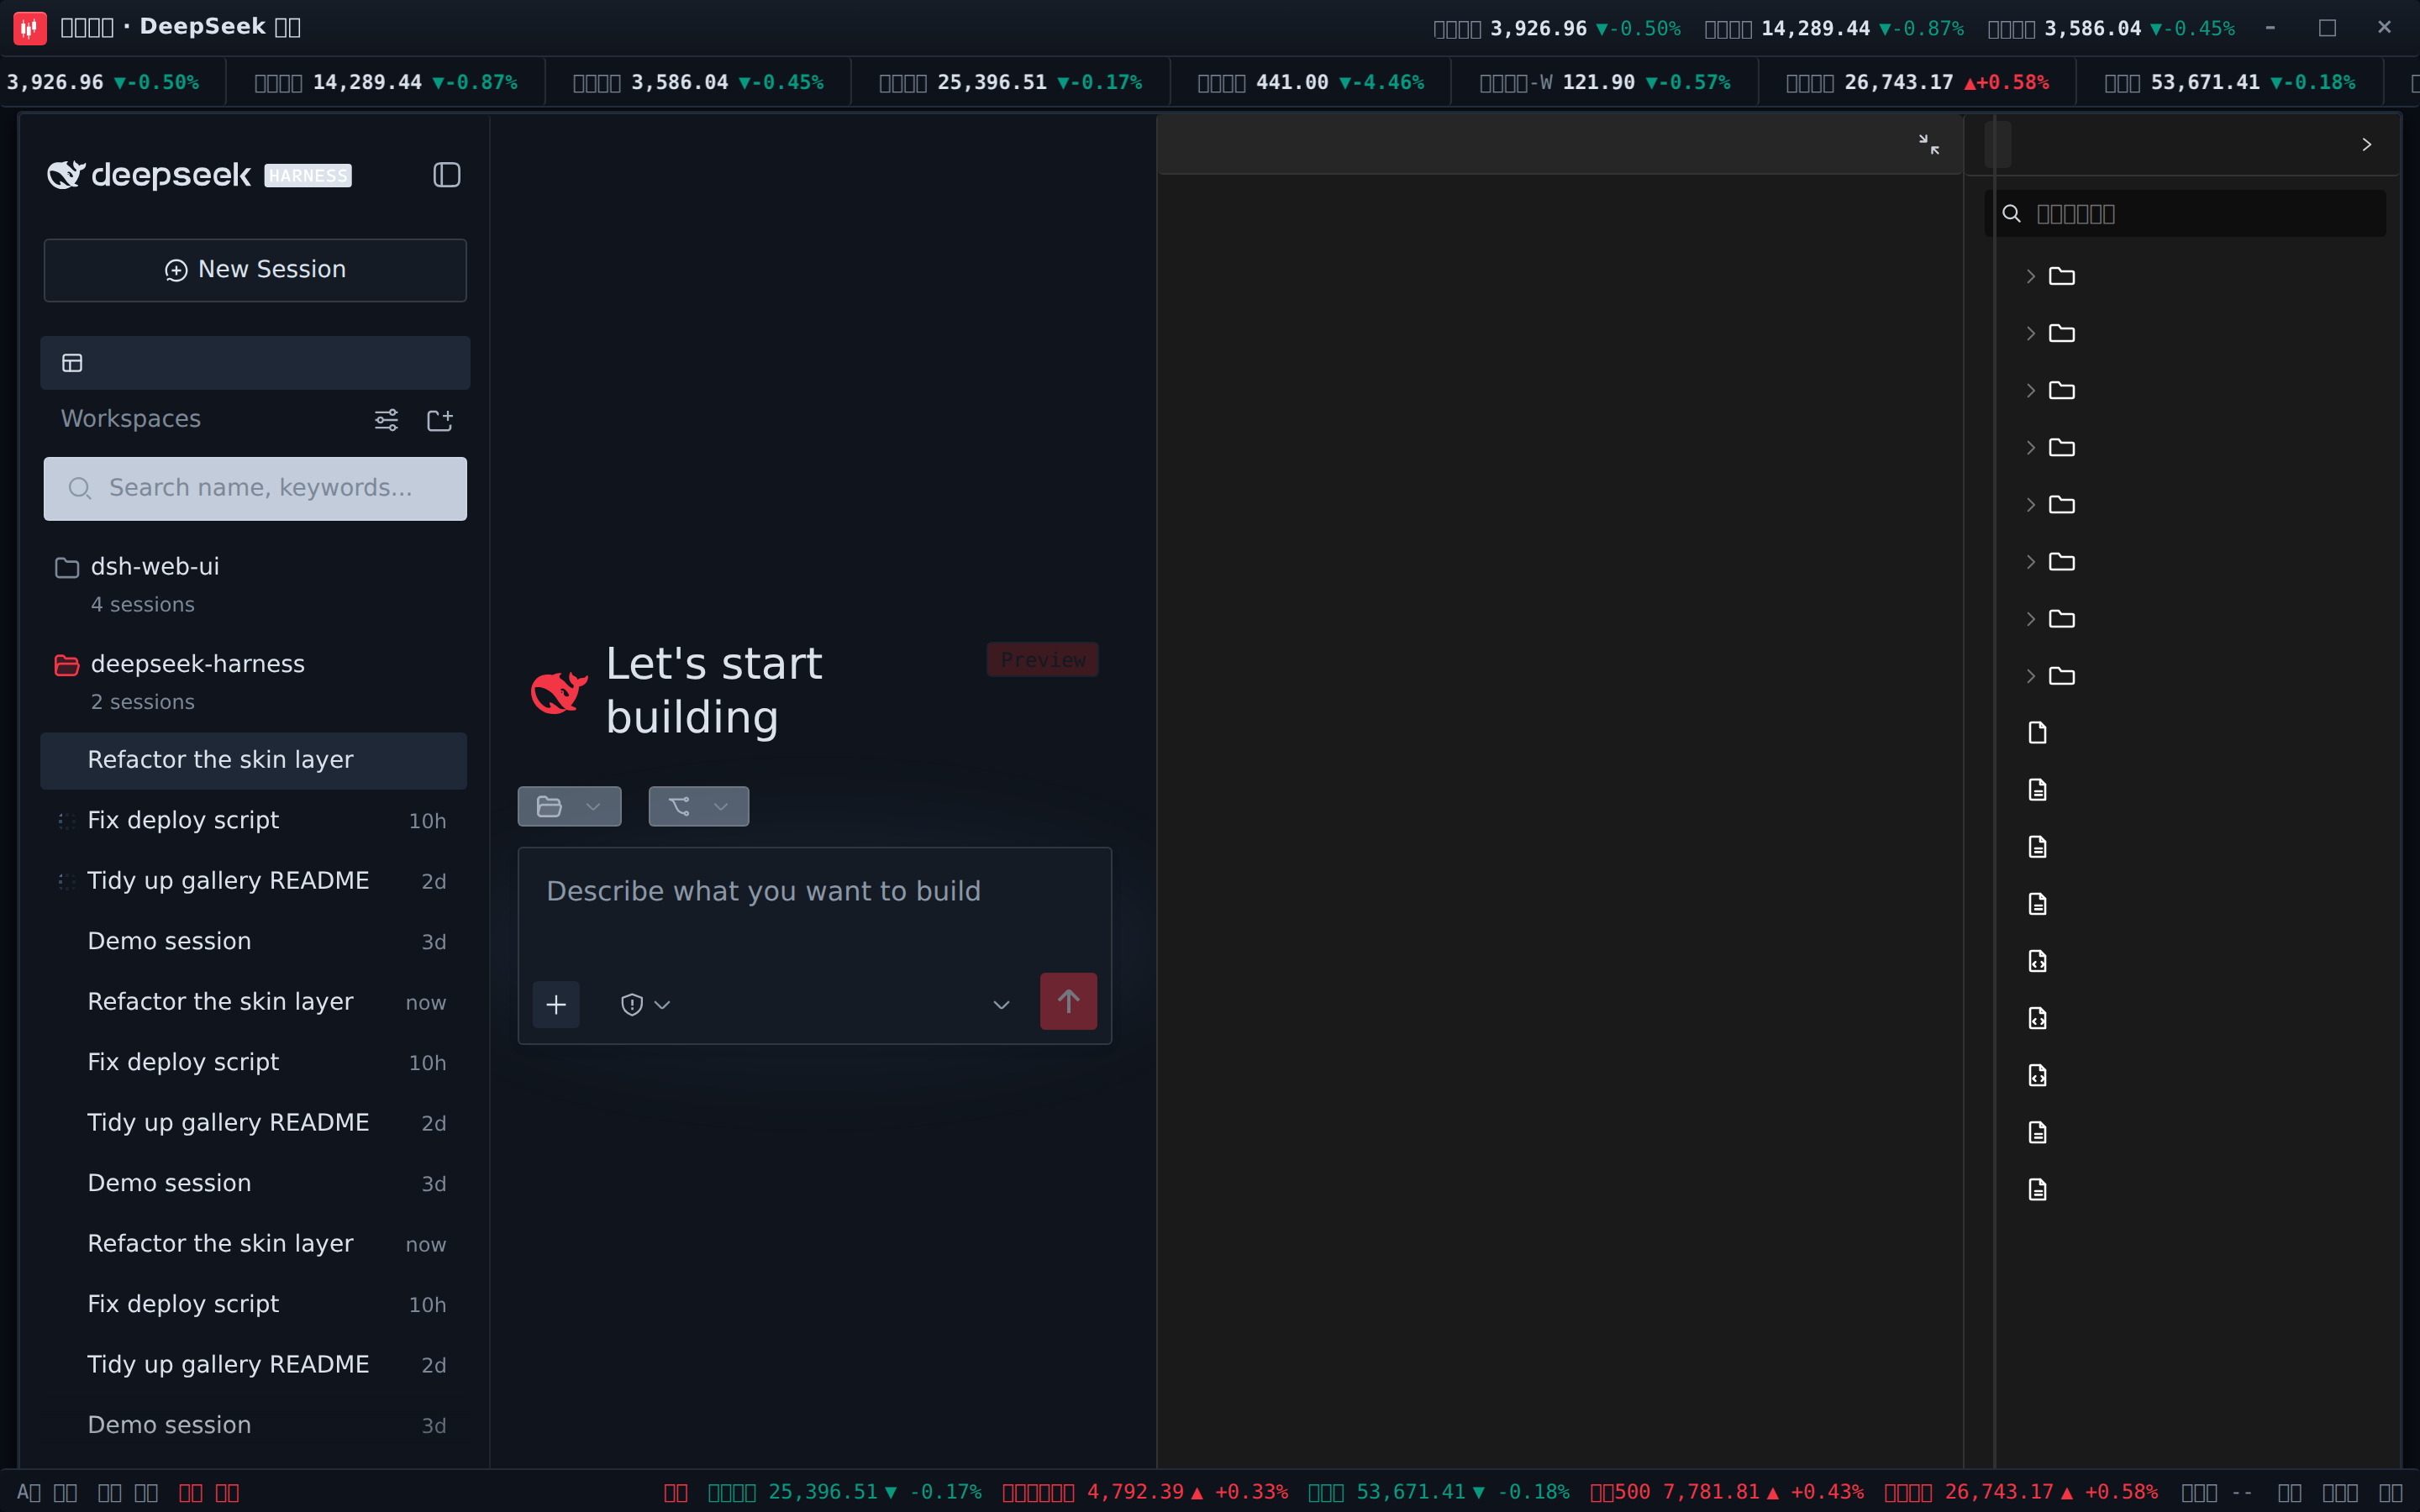
交易终端(Trading Terminal)
带实时行情的炒股皮肤:顶栏滚动跑马灯(A股 / 港股 / 美股 / 指数 / 加密 / 外汇,红涨绿跌),标题栏行情快签,状态栏展示 A股 / 港股 / 美股交易时段与港美股指数。已安装 dsh-fun-ticker 时跑马灯跟随你的自选列表(同源代理取数),已安装 dsh-longbridge 时指数格渲染长桥券商快照;两个插件都没装也能直接走公共行情源(腾讯 / 币安 / Frankfurter)独立工作,所有路径失败都安全降级为 --。
 ·
· 
其余三款:QQ2008 怀旧版(水晶蓝配色与企鹅元素)、同花顺风格(行情元素融入界面)、龙的传人(朱砂龙印主题)。
下载、校验与升级
- 从 GitHub Releases 下载最新的 Windows x64 安装包。
- 运行
DeepSeek-Harness-Desktop-Setup-<版本号>-x64.exe完成安装;DSH、插件、皮肤、pnpm 和原生依赖均已随安装包提供。 - 如需核验文件完整性,请下载同一 Release 中的
SHA256SUMS.txt并比对安装包 SHA-256。
GitHub Releases 是应用内置且默认使用的唯一下载源。如果 GitHub 下载速度较慢,可点击更新窗口的「加入用户群」,通过 QQ 群 1105158177 获取同步提供的最新安装包;应用不会默认启用或宣传第三方镜像为“更快”线路。
应用会检查稳定版 GitHub Release,展示中英双语更新说明,并提供「前往 GitHub 下载」「加入用户群」「稍后更新」。安装仍需明确确认,覆盖升级不会删除既有 DSH_HOME、桌面 profile、社区 bundle、桌宠状态、皮肤配置或已加密的 QQ Bot 凭据。
当前安装包没有商业代码签名,Windows SmartScreen 可能显示“未知发布者”。请只使用本项目 Release 页面提供的安装包;推荐采用默认安装路径,避免过长路径触发传统 Win32 限制。
来源与版权
| 包 | 来源 | 版权 |
|---|---|---|
| dsh-task-board / dsh-git-graph / dsh-aionui-panel / dsh-pet / dsh-particle-theme / dsh-remote-web-ui / dsh-live-stats / dsh-web-ui-settings / dsh-skins / dsh-web-ui-all / skins | 作者 zhu1090093659 个人开发 | BSD-3-Clause(zhu1090093659) |
迁入第三方代码必须保留 LICENSE 与署名;活跃且有上游的第三方优先 fork 或依赖引用,不搬代码。
友情链接
- 本项目积极参与并认可 LINUX DO 社区。
查看使用指南 →
该插件的安装步骤、关键要点、FAQ 与兼容性说明(基于已收录字段派生)。
收录徽章

[](https://deepseek-plugin.org/plugins/ningbainb/deepseek-harness-desktop/packages/skins/skin-center)把这段 markdown 粘贴到你的 GitHub README,链接回本插件详情页。徽章只声明已被本站收录,不代表安全认证。