记录 DSH 每次大模型调用的 token 用量与消耗,按 DeepSeek 峰谷价格计算费用,支持余额查询、用量日历与 CSV/JSON/PNG 导出,数据自动落盘到固定目录。

- 语言
- JavaScript
- License
- MIT
- 分支
- main
安装
$ dsh plugin --profile web add @feiyang666/dsh-usage-plugin在终端中运行以上命令,通过 dsh CLI 安装此插件。可在右上角切换 Profile。 第一次用 dsh?看这篇新手教程
对话式安装
帮我安装 DeepSeek Harness 插件 feiyang-dev/dsh-usage-plugin:先查看仓库 https://github.com/feiyang-dev/dsh-usage-plugin 确认安全性,然后执行安装命令并验证插件加载成功。
把这段指令粘贴给 DSH Web GUI 里的助手,由它代你完成安装与验证。
一句话定位
DeepSeek Harness 的用量与消耗统计插件。装好后在 WebUI 顶部多出「用量与消耗」「剩余余额查询」两个 Tab,自动记录每次模型调用的 token 与费用。
核心能力
- 自动记录每次模型调用的输入、输出、缓存命中、缓存写入、推理 token,以及结束原因
- 按 DeepSeek 官方峰谷价格(北京时间 9:00–12:00 / 14:00–18:00 为高峰)自动计算消耗,2026-08-17 后切换到峰谷价
- 提供按模型、按「服务商 × 模型」的聚合表,支持今天 / 近 7 天 / 近 30 天 / 全部 / 自定义日期区间筛选
- 月度用量日历热力图,可按日查看明细
- 查询 DeepSeek / SiliconFlow / DigitalOcean 账户余额;面板内可管理 DigitalOcean 账户级 Token
- 导出 CSV / JSON / PNG 长图(最多含最近 2000 条),可选默认目录或使用系统原生文件夹选择器,导出后自动打开目录
- 导入 CSV / JSON 与已有记录按时间戳去重合并;价格表可在面板内编辑持久化
技术实现
- 语言: JavaScript(ES Module,
"type": "module",无 TypeScript) - 关键依赖:
@deepseek-ai/cordis(peer,^4.0.1)、宿主提供的webServer/fs/subprocess/credentials/settings/sandboxPolicy/agentsCordis 服务;无第三方运行时依赖 - 架构模式: 双半包(Host + Client)一体:
lib/index.js是宿主页 Cordis 插件,订阅llm/stream事件抓取 usage chunk 并暴露POST /usage/api;lib/client.js是浏览器页 React 组件,通过slots.inject("conversation.view")与slots.inject("settings.section")挂载两个 Tab;通过dsh.bundle.patch(cordis.patch.yml)+dsh.client声明被 DSH 自动识别与加载 - 入口文件:
lib/index.js(host,exports.default为 Cordis 插件对象)、lib/client.js(client,通过exports["./client"]暴露)
适用场景
需要持续追踪 DeepSeek / SiliconFlow / DigitalOcean 等多服务商账户余额与 token 消耗的 DSH 用户。尤其适合按月核对账单、估算高峰期与空闲期费用差异、做团队成本分摊,以及把历史用量数据带到外部分析工具(导 CSV/JSON)的人。
前置依赖与兼容性
| 依赖 | 最低版本 | 说明 |
|---|---|---|
| DSH(DeepSeek Harness) | 未声明 | 通过 @deepseek-ai/cordis ^4.0.1 接口对接,需宿主支持 webServer / fs / subprocess / credentials / settings / sandboxPolicy / agents 七项服务 |
| Node | >= 18 | package.json#engines.node 声明 |
| 操作系统 | macOS / Windows / Linux | 目录选择器走系统原生:macOS 用 osascript,Linux 用 zenity 或 kdialog,Windows 用 PowerShell FolderBrowserDialog |
| 原生模块 | 无 | 不依赖任何 node-gyp 原生扩展,持久化经宿主进程 node:fs 直接读写 |
安装方式
dsh plugin --profile web add github:feiyang-dev/dsh-usage-plugin
配置项
本插件无需额外配置。所有行为由包内 PRICING / 路径解析逻辑与宿主 settings.llm-pi-ai 提供商配置共同决定,价格可在面板内「价格表」Tab 调整并持久化到 <数据根>/dsh-usage/pricing.json,必要时可用 DSH_USAGE_DATA_DIR 环境变量覆盖默认数据目录。
常见问题
Q: 装好后看不到「用量与消耗」和「剩余余额查询」两个 Tab 怎么办?
A: 一般是插件行的 inject 列表缺失或被截断。看数据根(默认 Windows %LOCALAPPDATA%\dsh-usage-plugin\dsh-usage\,macOS/Linux ~/dsh-usage-data/dsh-usage/)下是否生成 dsh-usage-boot.log,里面会标注激活失败的具体步骤;正常情况应能看到 route-registered 一行。如果 patch 文件被手工编辑丢字段,按 npm run wire 跑一次 scripts/wire.js 重新接线即可。
Q: 数据存在哪里?切换工作区会不会丢?
A: 自 v1.9.2 起数据落到独立目录,v1.9.4 改用宿主进程 node:fs 直接写,完全绕开工作区沙箱:默认 Windows 写到 %LOCALAPPDATA%\dsh-usage-plugin\dsh-usage\、macOS/Linux 写到 ~/dsh-usage-data/dsh-usage\。切换工作区不再丢失,更不会因卸载 DSH 桌面版而一并清空。旧版本散落在用户主目录或旧工作区的记录会在首次启动本版本时按 time 去重合并进来。可用 DSH_USAGE_DATA_DIR 环境变量强制指定到任意路径。
Q: 怎么查 DeepSeek / SiliconFlow / DigitalOcean 的账户余额?
A: 进「剩余余额查询」Tab,选服务商再点查询。DeepSeek 用「设置 → 模型」里配置的 DEEPSEEK_API_KEY;SiliconFlow 复用「设置 → 模型」中以 siliconflow 为 Provider ID 或显示名的服务商所引用的 API Key;DigitalOcean 需要先在面板里保存以 dop_v1_ 开头的账户级 Personal Access Token(不能用 DO AI 推理 Key)。AMD GPU Cloud 标注为「当前未公开余额查询端点」。
Q: 提示「持久化未启用」是什么情况?
A: 这是环境变量、AppData、用户主目录下的 dsh-usage-data 三条候选路径全部都不可写才会出现的回退提示,并把数据落到当前工作区。属于权限或磁盘空间异常,多发生在受限容器中。看到后请检查上述目录的写入权限,或直接用 DSH_USAGE_DATA_DIR 指向一个可写目录。
Q: 能导出哪些格式?导出后会自动打开目录吗?
A: CSV、JSON、PNG 长图三种。导出目录可选默认目录(数据根下 csv/、json/、images/)或点「导出目标目录 / 选择目录…」,Linux/macOS/Windows 都会调起各自系统的原生文件夹选择器,导出完成后再用 open / xdg-open / explorer.exe 自动打开所在目录。PNG 长图最多展示最近 2000 条,超出会给出提示。
Q: 能从别的设备或旧版本迁移记录吗?
A: 选 CSV 或 JSON 文件导入即可,按 time 字段去重合并;如果只是想换台机器继续用,把旧数据根下的 usage-records.json 拷到新机器同位置即可,无需导入。
Q: 峰谷价什么时候生效?怎么改?
A: 峰谷价自北京时间 2026-08-17 00:00 起自动启用;之前的历史调用按基础价计费。高峰时段为北京时间 9:00–12:00 / 14:00–18:00。面板「价格表」Tab 可在运行时修改并立即持久化,点「恢复默认」一键还原。
Q: 怎么卸载?
A: 推荐 dsh plugin --profile web remove @feiyang666/dsh-usage-plugin。如果是手工安装,请从 cordis.patch.yml 删掉 usage-plugin 行再 pnpm remove / npm uninstall 该包。卸载不会删除数据目录,如不再需要请手动清理。
上手难度
入门 — 一条命令安装、无配置文件,余额查询前在「设置 → 模型」里填好对应 Provider 的 API Key 即可。
已知问题与限制
- AMD GPU Cloud 当前未公开可由推理 API Key 调用的余额查询端点,面板里点查询只会给出提示并引导去 AMD Developer Cloud 控制台查看(lib/balance.js:31-40)
- DigitalOcean 余额查询只能用账户级
dop_v1_...Personal Access Token,DigitalOcean AI 推理 Key 不能用于此接口(lib/index.js:749-751, lib/balance.js:21-30) - 旧 npm 包名
@feiyang666/deepseekharnessdesktop已不再维护,新装请使用@feiyang666/dsh-usage-plugin(README.zh.md:19-26) - 不要手动修改
~/.dsh/profiles/<名>/node_modules/@feiyang666/dsh-usage-plugin/下的文件,每次pnpm update/ 升级都会从 npm 重新解包覆盖,本地改动会被静默丢弃(README.zh.md:230) - 仅 DeepSeek 官方与 SiliconFlow、DigitalOcean(美元)有计费价格表,其它第三方 Provider 调用(
amd/aliyun/qwen等)的消耗按 0 统计(lib/index.js:107-148)
DeepSeek Harness Usage & Cost Tracker (dsh-usage-plugin)
English · 简体中文
A community plugin for DeepSeek Harness — records token usage and cost for every model call, with peak/off-peak billing, balance query, a calendar heatmap, and CSV / JSON / PNG export.



🔔 Important Notice (2026-08-16): npm package renamed
The npm package has been renamed from
@feiyang666/deepseekharnessdesktopto@feiyang666/dsh-usage-plugin(matching the GitHub repofeiyang-dev/dsh-usage-plugin).
- Use the new package name for install / upgrade:
dsh plugin --profile web add @feiyang666/dsh-usage-plugin- The old package
@feiyang666/deepseekharnessdesktopremains published for a while, but it is no longer maintained and will not receive updates — please migrate soon.- The desktop client (
DeepSeek Harness Desktop) supports both package names and will auto-detect old-name installs with a one-click update to the new name.
Overview
dsh-usage-plugin is a usage & cost tracker plugin in the DeepSeek Harness ecosystem (a DSH plugin shipped as a Host + Client two-in-one package). After installation, "Usage & Cost" and "Balance Query" tabs appear in the Web UI, right after "Conversation" and "Trace":
Supports Windows / macOS / Linux: paths are handled per platform (
node:path), and the folder picker / "reveal in file manager" use each OS's native mechanism (macOS:osascript/open; Linux:zenity/xdg-open). Balance query and export do not depend on Windows-only commands.
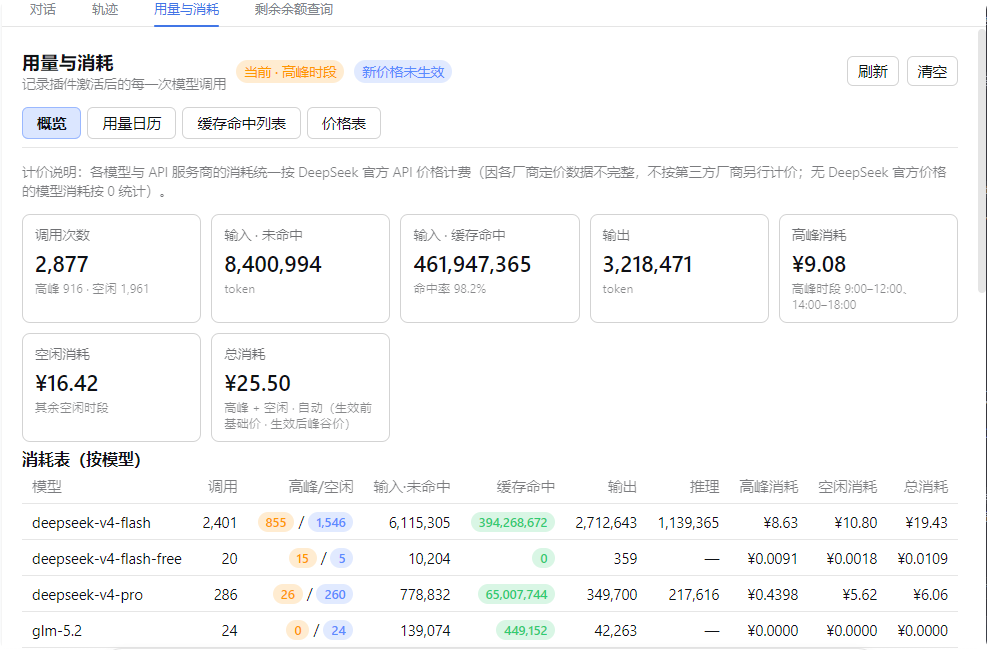
- Usage & Cost: records each model call's token usage and cache hits (input miss / cache hit / cache write / output / reasoning / finish reason), and computes cost using DeepSeek's peak/valley or base pricing (peak hours are automatically priced by Beijing time 09:00–12:00 and 14:00–18:00). Model names come from the actual request parameters, so non-DeepSeek models are shown truthfully instead of "unknown model"; models without an official price are counted as 0. The overview shows a by-model table plus a by-API-provider × model drill-down (each provider grouped with every model's calls and peak/off-peak cost split) and a grand total row. The overview also supports date filtering (Today / Last 7 days / Last 30 days / All, plus a custom start–end range), so the aggregate stats can be scoped to any single day or date range.
- Usage Calendar: a monthly daily-usage heatmap (colored by cost or call count), hover for details including the peak/off-peak cost split, click a day for its call list and peak/off-peak totals, plus a per-day statistics table with peak cost / off-peak cost / total columns and monthly rollups.
- Cache Hit List: newest-first, fully scrollable, with quick filters (Today / 7 days / 30 days / All) and custom date ranges; the summary line and footer total split peak vs off-peak consumption with a grand cost total. The list is paginated (100 rows per page), so it stays smooth even with large data volumes.
- Price Table: the official DeepSeek API price table — base and peak/valley unit prices shown side by side (peak vs off-peak), editable in-panel and persisted to
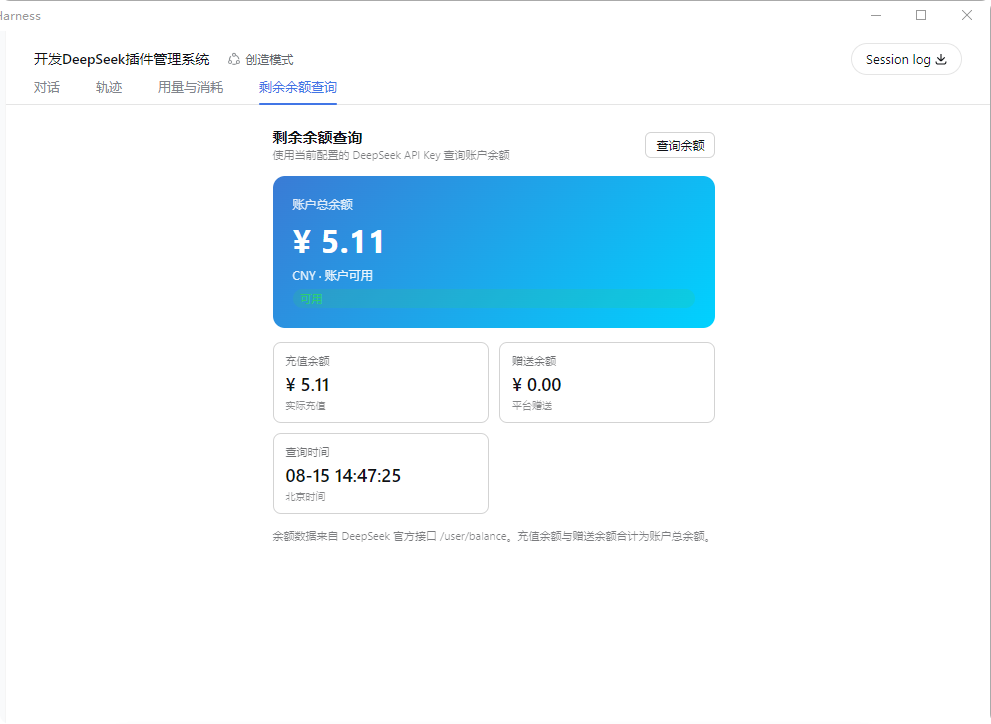
pricing.json, with a reset-to-default option. - Balance Query: queries your DeepSeek account balance using the configured
DEEPSEEK_API_KEY. - Export: CSV / JSON / PNG long image (newest-first, up to the latest 2000 records, warns if exceeded; the PNG report includes peak/off-peak cost columns), to any directory (native picker), auto-opens the folder after export.
- Import: merge-imports JSON / CSV files, deduplicated by time.
- Persistence: records are written live to
<session workspace>/dsh-usage/usage-records.jsonand restored on restart (cap 100000 records). - UI adaptation: panel typography scales with the app's display-size setting (em-relative fonts); table wrapping and spacing are tuned so large display sizes stay readable.
Screenshots
Usage & Consumption
Balance Query
Recommended Installation
Either method works and is equivalent. We recommend the desktop app — fully graphical, no command line needed.
Option 1 (recommended): One-click via the desktop app
Install DeepSeek Harness Desktop, open it, then go to "Install Plugins" → Recommended → Usage & Cost Tracker → Install and click "Restart Service Now" to activate.
Option 2: Command line
# Prerequisite: install dsh (npm install -g @deepseek-ai/dsh)
dsh plugin --profile web add @feiyang666/dsh-usage-plugin
Or install to another profile:
dsh plugin --profile web add @feiyang666/dsh-usage-plugin
dsh plugin --profile headless add @feiyang666/dsh-usage-plugin
Restart the dsh web service after installation. Detailed manual install / wiring / uninstall / troubleshooting follows below.
What's in the package
One npm package = a host half (Node-side Cordis plugin: recording, billing, balance query, export — see lib/index.js) + a client half (browser-side panel — see lib/client.js, which talks to the host via /usage/api).
The package integrates with DSH through two declarations:
| Declaration | Purpose |
|---|---|
dsh.bundle.patch (cordis.patch.yml) | Lets DSH recognize it as a standard bundle plugin package: dsh plugin --profile <name> add <package> installs and wires it in one command, no manual config editing |
dsh.client + exports["./client"] | Lets the web client auto-load the browser panel at /plugins/<package>/client.js |
So for users, installation is one command — no YAML editing, no manual file copying.
Installation (for users)
0. Prerequisites
- DeepSeek Harness installed (
npm install -g @deepseek-ai/dsh, or a desktop app built on it, ornpx @deepseek-ai/dsh web). - Option A (recommended) needs pnpm:
npm install -g pnpm(orcorepack enable). - Make sure
dshis on PATH (for the desktop app, run in its bundled terminal).
1. Method A (recommended): one command
dsh plugin --profile web add @feiyang666/dsh-usage-plugin
This does three things (all automatic):
- Installs the package via pnpm into
~/.dsh/profiles/web(auto-initializes the profile on first use); - Detects the package's
dsh.bundledeclaration and writes the package name into the profile'sdsh.profile.bundleslayer list; - After restart, DSH reads the package's
cordis.patch.ymland mounts the plugin row into the app tree — no manual config editing.
Same for other profiles (replace web with your profile name, e.g. dsh plugin --profile headless add ...; dsh web equals dsh --profile web).
Test a local tarball:
dsh plugin --profile web add C:\path\to\feiyang666-dsh-usage-plugin-1.9.0.tgz
2. Method B: manual install (no pnpm / no dsh plugin)
Only for when you have no pnpm or want full manual control. Do not npm install directly at ~/.dsh/profiles (that dir has no package.json; npm would treat the whole node_modules as residue and wipe it).
B1. Use pnpm but not dsh plugin:
cd ~/.dsh/profiles/web
pnpm add @feiyang666/dsh-usage-plugin
# then manually append the plugin row to web/cordis.patch.yml (see B3) and restart
B2. Or use npm: add a minimal package.json to the profile first, then install:
cd ~/.dsh/profiles/web
# if no package.json exists there yet (only after `dsh plugin` init):
# echo '{"name":"dsh-profile-web","private":true,"dependencies":{}}' > package.json
npm install @feiyang666/dsh-usage-plugin
B3. Wire it up (once, idempotent): append to ~/.dsh/profiles/web/cordis.patch.yml:
- insert:
    - id: usage-plugin
      name: '@feiyang666/dsh-usage-plugin'
      inject:
        - fs
        - webServer
        - subprocess
        - credentials
        - sandboxPolicy
        - agents
Or just run the package's built-in wiring script (auto-finds the profile and appends, idempotent):
node node_modules/@feiyang666/dsh-usage-plugin/scripts/wire.js
⚠️ The
injectlist is required: it makes Cordis wait untilfs/webServer/subprocess/credentials/sandboxPolicy/agentsare ready before activating the plugin. Without it the/usage/apiroute never registers and the panel fails withUnexpected end of JSON input.
3. Method C: desktop app
The desktop app (e.g. DeepSeek Harness Desktop) uses the same ~/.dsh/profiles underneath. Run Method A's command in any terminal, restart the app, and the plugin activates automatically (the app starts the same dsh web).
4. Restart and verify
Restart the DeepSeek Harness web app (command line: kill the old process and re-run dsh web; desktop: fully quit and reopen). Then:
- Refresh http://127.0.0.1:3080 — after "Conversation" and "Trace", you should see "Usage & Cost" and "Balance Query" tabs; there are entries in Settings too.
- The "Usage & Cost" panel contains Overview / Usage Calendar / Cache Hit List / Price Table subtabs.
- Send a message and the "Usage & Cost" panel should show this call's token / cost record.
5. Configuration (for balance query)
"Balance Query" uses the configured DEEPSEEK_API_KEY: set the API Key in Settings → Models (same key used for chats), then open the "Balance Query" tab and click "Query Balance".
Uninstall
dsh plugin --profile web remove @feiyang666/dsh-usage-plugin
(Equivalent to pnpm remove; dsh plugin auto-removes the package name from the dsh.profile.bundles layer list.) Restart the app afterward.
For manual installs (Method B), do it in reverse: remove the usage-plugin row from cordis.patch.yml, then pnpm remove / npm uninstall the package, and restart.
Upgrading from a 1.0.x manual-wiring install to 1.1.x: first remove the old
usage-pluginrow fromcordis.patch.yml(or follow the uninstall flow), then reinstall via Method A to avoid mounting the plugin twice.
How to update
Releasing happens on npm, so updating just means pulling the latest published package. Your usage history is safe — since v1.9.2 it lives in a fixed dedicated directory (not in any profile / workspace), so an update never wipes it.
Desktop app
Open "Install Plugins" → find Usage & Cost Tracker → click Update (or Re-install) → "Restart Service Now". If there is no Update button, just remove then re-add it.
Command line (Method A)
Re-running add is idempotent and pulls the newest version:
dsh plugin --profile web add @feiyang666/dsh-usage-plugin
dsh web   # restart
Pin a specific version:
dsh plugin --profile web add @feiyang666/[email protected]
Manual install (Method B)
In the profile dir:
cd ~/.dsh/profiles/web
pnpm update @feiyang666/dsh-usage-plugin   # or: npm update @feiyang666/dsh-usage-plugin
Verify the installed version
npm ls @feiyang666/dsh-usage-plugin --prefix ~/.dsh/profiles/web
⚠️ Do not hand-edit files under
~/.dsh/profiles/web/node_modules/@feiyang666/dsh-usage-plugin/(e.g.lib/index.js/lib/client.js). Every update re-extracts the package from npm and overwrites those files, so local edits are silently lost. To change behavior, fork the repo and publish your own version, or contribute upstream.
Data & locations
Since v1.9.2, records are stored in a fixed, dedicated data directory (fixes #4). The path no longer follows the session workspace /
~/.dsh/ desktop-app install dir, so your history never "disappears" (counted as 0) when the workspace changes, and the path shown in the UI equals the on-disk path.
- Records:
<data root>/dsh-usage/usage-records.json- Resolution order for the data root (data always lands in the first writable dir of this list, never in the workspace unless all of the below are unwritable):
- env var
DSH_USAGE_DATA_DIR(if set) — overrides everything; - Windows:
%LOCALAPPDATA%\dsh-usage-plugin(falls back to%APPDATA%ifLOCALAPPDATAis unset); - user home dir:
~/dsh-usage-data(Windows%USERPROFILE%\dsh-usage-data, macOS/Linux~/dsh-usage-data); - fallback (rare): current workspace
<workspace>/dsh-usage— only used when all system/user dirs above are unwritable, and the panel will show a "persistence disabled" warning.
- env var
- Writes bypass the model sandbox: persistence is done by the host plugin process's own filesystem, not subject to the
workspace-writesandbox, so the fixed directory is always writable and data is not lost when switching workspaces. - Default on Windows:
%LOCALAPPDATA%\dsh-usage-plugin\dsh-usage\usage-records.json
- Resolution order for the data root (data always lands in the first writable dir of this list, never in the workspace unless all of the below are unwritable):
- Legacy data auto-merge: on first start, records previously scattered in
%USERPROFILE%\dsh-usage,~/.dsh/dsh-usage, and each workspace'sdsh-usage(or.dsh-usage-records.json) are merged into the fixed root, deduplicated bytime— no manual migration needed. - Price config (edited & saved in the panel):
<data root>/dsh-usage/pricing.json - Default export dir:
<data root>/dsh-usage/{csv,json,images}/ - Custom export dir: set in the panel's "Export target directory" or click "Choose directory…"
- Startup diagnostics (if the plugin fails to activate):
dsh-usage-boot.lognext to the data root
FAQ
| Symptom | Cause / Fix |
|---|---|
Panel reports Unexpected end of JSON input | The plugin row is missing the inject list, so the route isn't registered. Add the inject list per Method B3 and restart |
| Panel blank / no top tab | Plugin not activated. Check dsh-usage-boot.log; confirm the cordis.patch.yml row exists with the correct name |
| Balance query fails with "DEEPSEEK_API_KEY not configured" | Set the API Key in Settings → Models |
| Balance query network error | Ensure api.deepseek.com is reachable (configure a proxy if needed) |
dsh plugin reports pnpm not found | Install pnpm: npm install -g pnpm |
| Install can't reach the npm registry | Set a mirror: npm config set registry https://registry.npmmirror.com (or pnpm config set registry ...) and retry |
After uninstall, still reports Cannot find package '@feiyang666/...' | A package reference remains in the profile. Remove the corresponding row from cordis.patch.yml and the package name from dsh.profile.bundles, then restart |
Related Projects
| Project | Description | Installation |
|---|---|---|
| DeepSeek Harness Desktop | Windows desktop console: install/start/stop/restart the dsh web service with one click, built-in plugin management — install this plugin from its Recommended section | Download the desktop app and click a few buttons |
| Data Vault (dsh-vault) | Auto backup / wipe detection / one-click restore — protects chat history and workspace data | One-click from the desktop app, or dsh plugin add @feiyang666/dsh-vault |
| DeepSeek-Harness | Official CLI / Web service | Quick start below |
Running DeepSeek Harness
Quick start (via npm)
Install Node.js, then run:
npx @deepseek-ai/dsh web
This command starts the Web UI at the default address http://127.0.0.1:3080. See the Web UI Guide for details.
Run from source
To run from the repository source:
git clone https://github.com/deepseek-ai/deepseek-harness.git
cd deepseek-harness
pnpm install
pnpm run build
pnpm dsh web
Acknowledgements
- @Martin-soaring-dev: prepared the plugin for public contribution (packaging, plugin-contract checks, docs & CI) and submitted the contribution branch that became the basis for the open-source releases (#6).
- @mumuer1024: reported and diagnosed the persistence-path drift across workspaces (history "disappearing" / counted as 0) and proposed storing data in a fixed, dedicated directory (#4).
- @liu3734: reported and diagnosed the Windows-only path handling / spawn issues on macOS (POSIX) and proposed the cross-platform fix (#1).
License
MIT © dsh-usage-plugin
查看使用指南 →
该插件的安装步骤、关键要点、FAQ 与兼容性说明(基于已收录字段派生)。
收录徽章

[](https://deepseek-plugin.org/plugins/feiyang-dev/dsh-usage-plugin)把这段 markdown 粘贴到你的 GitHub README,链接回本插件详情页。徽章只声明已被本站收录,不代表安全认证。